31 August 2020

More Sidewalk Furniture

Hi there! In a previous post, I regaled you with stories about free furniture on the streets of New York City. 

Yes it's true! If only I had a truck and a warehouse, I would comb the streets for these finds and give them a totally new look. I'll probably be able to furnish an entire apartment with all that I collect! And with many folks moving out of the city as a result of the pandemic, there's a lot of free furniture on the streets. There's even a dedicated Instagram account called @stoopingnyc to alert followers of these treasures. 

Here are the ones I spotted in the West Village:

Piece Number 1: Tall and skinny shelf
Piece Number 2: Two-tier side table
Piece Number 3: Rattan end table
Piece Number 4: Four-tier etagere

Shelves and side tables in a neat row! And in good condition, too.  Had I taken them home with me, here's how I would transform them from blah to TADA!

For the tall and skinny shelf:

In the absence of a dedicated home office, the next best option is to carve out some space out of another room. The most popular target? The living room, since it's a centrally located "daytime" space that keeps work from bleeding into the bedroom.
via Apartment Therapy

I would put it in a tight corner of my work-from-home space to store books and memorabilia.


Or position it horizontally and turn it into a storage bench...TADA!

For the two-tier side table:

via Emily Henderson

It will be useful as a bedside buddy (even if it doesn't have a matching pair).

stockholm apartment, cate st. hill
via Cate St. Hill

I can also put it beside a favorite reading chair to hold books and a cup of tea...TADA!


Okay, two pieces down but there's still more:


Let's start with the rattan end table.

This bamboo bedside table pairs perfectly with the classic decor of the bedroom.
via Apartment Therapy

I would stain it in a richer brown and welcome it into a bedroom.

@Ashley Walters Walters Walters Burns: Small Rattan Table - bright painted wicker seems to be popular!
via Pinterest

Or paint it in a wild color as an accent piece for the balcony or a kid's room...TADA!


And finally, my ideas for the four-tier etagere (open shelves):

via Pinterest

I would paint it white -- perfect for a modern farmhouse.

Eden Rue 4 Shelf Tower Étagère with Bamboo Style Legs - Seafoam - Target
via Pinterest

Or maybe in a sweet shade of sea foam or pale pink...TADA!

I hope you'll find some old furniture (in your own home or on the street) and turn them from blah to TADA!

24 August 2020

Crafty Tip: The Secret to Sharp Scissors

Hi guys! We use scissors everywhere -- the kitchen, classroom, and in our work spaces. But how does one keep a pair of scissors sharp? 

Here's a quick crafty tip and all you need is aluminum foil.

how to sharpen scissors, sharp scissors
Use your scissors to cut through the foil. Do this several times and do it every few months to keep them sharp...TADA!

Another tip that I got from Martha Stewart is to label all your pairs of scissors and use it for only one purpose (ex. paper, fabric, tape). 

And to protect your scissors, keep it secure in a case using felt or fabric. Here's how I made it: 

Start with a cardboard template and trace this on the felt (one for the front and one for the back).

Cut the felt.

Attach the front and back pieces together with hot glue and if you'd like, add a blanket stitch around for more reinforcement that also gives a pop of color...TADA! 


Do you have other ways to maintain the life of scissors? Please share!

17 August 2020

Bible Journaling


I am very pleased you stopped by today! I always, always appreciate your company.

Today, let's talk about crafts and practicing our faith. I'm quite spiritual and prayer is always a part of my day. I read the Bible and I write down God's messages for me in my Bullet Journal. But have you heard of Bible Journaling?

via Illustrated Faith 

Bible Journaling is scrapbooking on a Bible! Yes, it feels a bit rebellious writing and adding color to its the pages. Some people sing their praises, I don't see why we can't craft our praises! And doing so helps us remember these feelings and lessons, and even share them to others in a visually appealing manner.  

Special Bibles with extra-wide margins are used. Here you can write down your thoughts, decorate with markers, and add stickers and other ephemera.

You can visit Illustrated Faith, A Pile of Ashes, Day Spring and Confident Canvas or look for the tag #biblejournaling on Instagram for lots of Bible Journaling inspiration.

I have yet to acquire my own journaling Bible. Meanwhile I made this mini scrapbook:

I call it "Conversations with God" because these words come to me during prayer time.

It's made from a variety of cardboard boxes. Instead of tossing them, I'm turning them from blah to TADA! 

I didn't bother covering these with paint or paper. The imperfection reminds me to use what I have, do what I can, and that I don't have to spend money to create something meaningful.

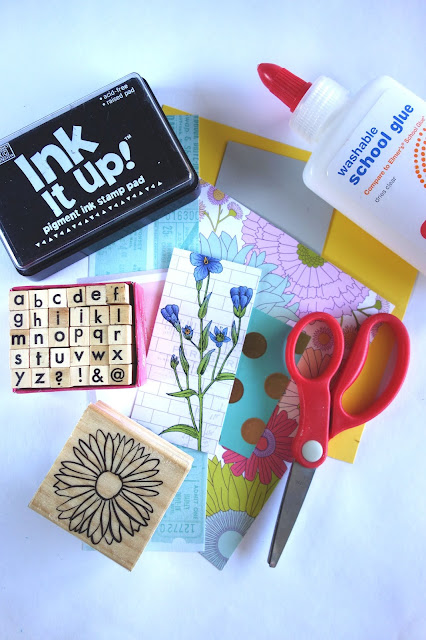
I'm also using scrapbook paper remnants, rubber stamps, an ink pad, scissors and glue.

Here are the pages I've made so far:

This one is a line from on a song.


These are a recurring message...a reliable reminder when I'm anxious.

This is also a line from another song.

I ask this question everyday.

Because we are created in God's likeness.

For when I'm feeling insecure.


These are also lines from a song about meekness and humility.

For all the sick people I include in my prayers especially during this time.

For when I am impatient.

For when I am extra impatient.

And I always end by counting my blessings.

I use them like flash cards, flipping through them regularly to remind me of God's promises. 

I hope this has inspired you to express your beliefs in creative ways. Have a wonderful week!


10 August 2020

Adorable Embroidery

Every now and then, I like to dabble in sewing crafts. It always reminds me of our sewing projects in elementary school where we learned basic sewing, cross stitching, and how to use the sewing machine.

But these days, I prefer small scale and low commitment projects so that I can finish in one sitting.

I found this book in the library. It's called "Stitch Love" created by Mollie Johanson. The cover definitely caught my attention -- adorable little creatures!

But flipping through the pages compelled me to borrow the book right away. It's a treasure-trove of ideas:


Sigh. Aren't they darling?

At the back pages are patterns that I traced on a sheet of paper.

 I transferred my chosen design to a piece of cloth.

The hot iron transfer pencil and an iron were very handy for this purpose.

I used a few sewing supplies like a needle, embroidery thread, scissors, and an embroidery hoop. 

Here's my stitched little bunny:

I outlined him with embroidery thread. To make the design my own, I filled in with colored pencil and sewed on a pompom tail...TADA!

I can hang this in my craft space or give it away. I think it will make a fun addition to a child's bedroom, don't you think?

And that's how I turned plain fabric from blah to TADA!


***An update as of August 28, 2020:

My embroidered blue bunny was among the embroidery hoop DIY projects featured on the Michaels Instagram Feed...TADA!

03 August 2020

Crafty Tool Spotlight: A Funnel Tray

Crafting is my all time favorite hobby which is why I'm always on the lookout for tools that help me do things efficiently.

Here is one that blew my mind:

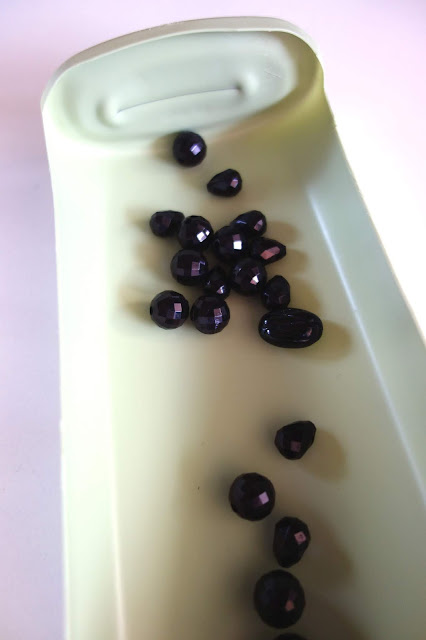
This is called a bead funnel tray.

It looks like a flask with a window.

It has a hole that can be opened or sealed with a screw-on cap.

For jewelry makers, simply put the beads on the tray to keep them from rolling off your table. Whether you use needle and thread, wire, elastic cord, leather or ribbon to assemble your jewelry, the tray neatly corrals your beads.  

Once done with this set of beads, unscrew the cap...

And transfer the beads to a storage container. The flask works as a funnel...TADA!

No mess, no stress! I love that! 

For paper crafters, use the tray for glitter, embossing powder, and small confetti. 

Once you're done, the left-over glitter easily falls back into its jar...TADA! No sweeping or dusting involved!

This nifty tool is not easily available in most craft stores. There are similar ones here and here. But why buy when we can D.I.Y.?


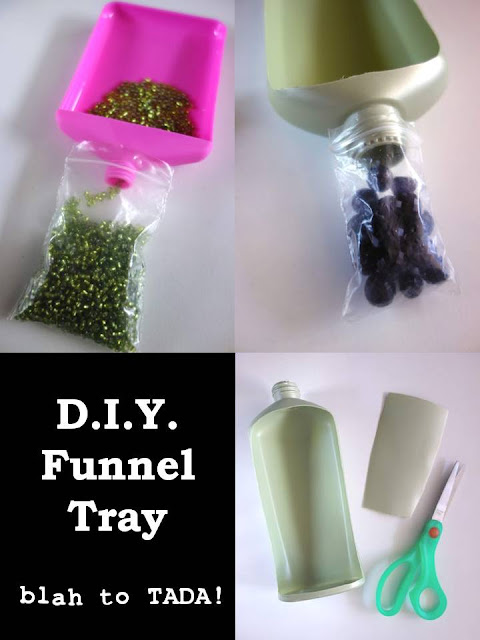
We can easily replicate a funnel tray using an empty lotion bottle. 

The best bottle to use is the one that's rectangular and can lie flat.

Rinse the inside with warm sudsy water, let it dry, and remove all the labels.


With a sharp pair of scissors, cut a window on one side of the bottle (you may need to make an initial cut with a blade especially if the plastic is thick...be very careful).

Try to make neat cuts and trim off any not-so-smooth edges. 

Detach the part of the lotion pump that looks like a straw...we no longer need this.

Screw the cap back on the bottle.

bead tray, jewelry making
Now we can use it as a funnel tray...TADA!

bead tray, jewelry making
I like to use it for bigger beads...

bead tray, jewelry making
Because they can easily fit through the hole and back into the container...TADA!


D.I.Y. funnel tray, how to recycle a lotion bottle, turn a lotion bottle into a funnel tray, crafty recycling, tools for crafting, blah to TADA, funnel tray DIY
Isn't it wonderful that we get to do some recycling and also add a new tool to our craft arsenal?