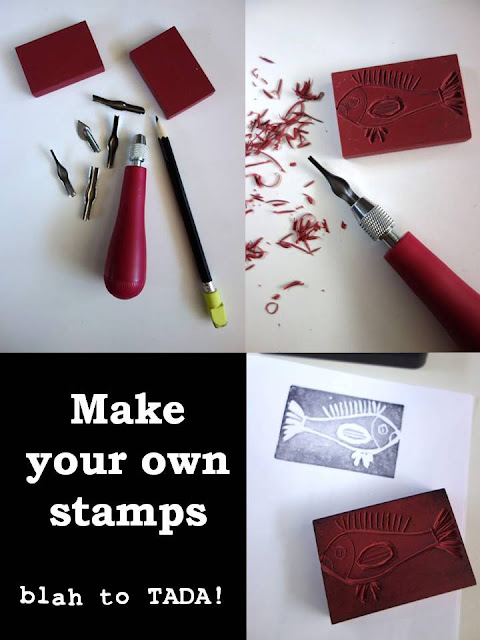
Thank you so much for stopping by today! Several years ago, I learned how to make my own rubber stamps. My skills have become rusty, it's about time I freshen up my technique. Would you like to carve some stamps with me?
I'm getting inspiration from this book that I borrowed from the library. It's "Making An Impression" by Geninne Zlatkis. Ever since I stumbled upon her work, I fell in love with her artistic style.
Geninne starts with a primer on where to get ideas -- hers are from nature, collected while walking outdoors with her dog.
She gives a list of necessary tools.
As well as many, many carving techniques.
At the back of the book, she has some sample illustrations that she used for her stamping applications like stationery, totes, t-shirts, and flower pots.
Here are the tools we will need: a pencil, a lino cutter with assorted blades, and carve blocks or rubber erasers (from the office supply store or dollar store).
Decide on an image and trace this with a pencil and a sheet of tracing paper.
Position the image for transfer: the pencil-side should face the carve block or rubber eraser.
Rub the image onto the carve block or rubber eraser using a spoon. Use even pressure to allow the image to adhere.
Gently remove the paper to reveal the transferred image.
If there are lines that are too light, go ahead and define those areas with a pencil.
Using the smallest blade of the lino cutter, carve out the lines as neatly and as straight possible.
Rinse the stamp with warm, soapy water to get out the "rubber crumbs" in the crevices. Dry with an absorbent towel.
Test your new stamp by adding some ink.
Use scrap paper to see your image. It will tell you if your carving needs more definition or cleaning up. But once satisfied, it's ready to use the stamp!
I made an envelope out of an old book.
Then I added the image...TADA!
I also made this version -- it looks like a Polaroid photo.
Now I've got these little envelopes that I can use for letter writing or gift wrapping featuring my very own stamp...TADA!


