25 September 2012

Blooming Summer

I hope your Tuesday is off to a good start. This week, I'm sharing my "Summer Album". It's based on a board I created on Pinterest called "Splendid Summer"

Here are a few photos featuring spectacular blooms, scents and song:

The great outdoors were abundant
with flowers...I just had to bring
the outdoors in. 

Yellow one week...

Green the next...

And pink for another...flowers are
such a simple way to turn
blah to TADA!

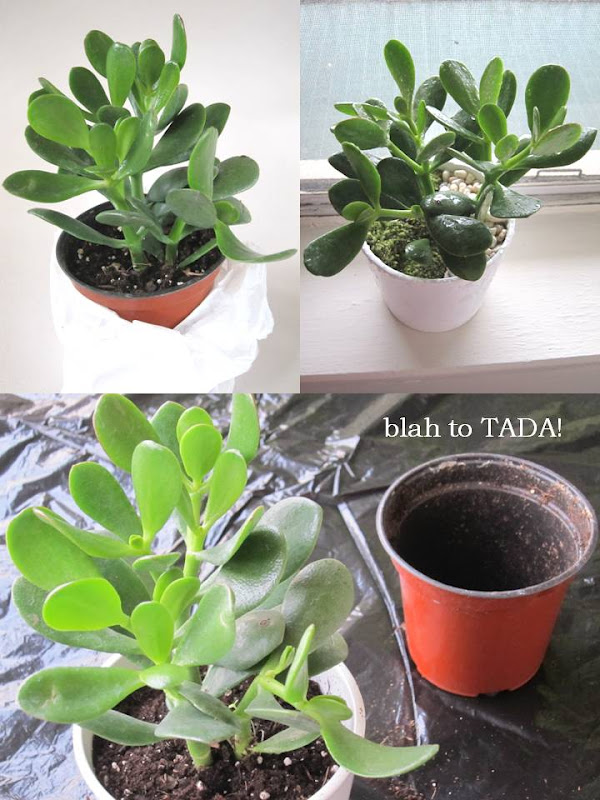
Grew some succulents.

Cared of a low-maintenance
mini garden.

Took a whiff of lavender at
the farmer's market (I hope
to make it a field next time).


Tried some new scents for the home.
I couldn't resist these hand soaps in
bottles designed by
Orla Kiely for Target.

I also got myself this candle
with the scent of caramel popcorn.

I wish I could say I owned this player, but
I listened to a few too many standards
on my iPod.
See you back tomorrow!

24 September 2012

Purposeful Pinning

Hello there! There was a tiny phrase printed on my calendar last Saturday. It said, "September 22 - First day of Autumn". My heart sank a little. Don't get me wrong, I love Autumn and everything associated with it -- apple-picking, amber-colored leaves, thick sweaters, delicious scarves, and knee-high boots. But I have a love affair with summer, and parting ways is absolute blah.

Sorry for the melodrama. To make-up for it, let me tell you about my "Splendid Summer". It's a board on my Pinterest page. I put this board together because I joined a contest over at Oh Joy. The winner was to receive an iPad plus a few other goodies just by pinning images that defined "splendid summer". Instead of random images, I made the exercise purposeful by listing through pictures, "50 Things I'd Like To Enjoy this Summer."

I didn't win, but all wasn't lost. As I ticked off the items on my list, I felt I was making the most out of a fleeting season. Blah to TADA!

Number 50 on the list is, "Create a summer album", and I'm doing just that. All this week, I'll  share the things I've done this summer.

Today, it's all about the yummy things I ate:

I baked a batch of cookies (chocolate chip walnut)

I indulged in some shaved ice - this is a
Taiwanese kind with strawberries and
condensed milk purchased at the
Fulton Stall Market, South Street Seaport

Another kind of shaved ice, this
time Korean, called Patbingsu
from Paris Baguette

Instead of making popsicles, I bought some!
 They're gelato pops dipped in chocolate.
Found them at the Pop Bar.

Ate some lobster (lobster rolls
from Smorgasburg)

Grilled a few burgers at home

Took the annual pilgrimage to
Dairy Queen for a blizzard!
I wish you a delicious day! More photos tomorrow.

21 September 2012

Make a Statement Without Saying a Word

Happy Friday! Here's a mood board to show you another way to wear a collection of brooches or a bunch of vintage buttons:

Statement Necklaces

1/2/3/4/5

Gather them up to make a necklace or bracelet! Attach each to a chain, felt backing or ribbon for a unique piece to wear, give or sell.

Check out this other fun inspiration from the Bloomingdale's catalog:

Wear all your brooches at the same time to mimic a bib necklace or jewel-encrusted top. I think this looks better editorially than in the practical world, but hey, it just might work.

Have a fancy weekend, my dears!

20 September 2012

Cuff Collection

Sometimes, I find plain bangles from the Dollar Store. While they are cute as they are, I usually itch for a blah to TADA! make-over. 

Here are some pegs on how to give them a face lift:

Cuff Collection

1/2/3/4/5

(1), (2), (3) Graphic Elements - use a permanent marker to draw some artwork or fancy them up with alphabet/numeral stickers.

(4) Neon Lace - cover the bangle with lace for texture and dimension. Create a lace "body suit"; slip it on the bangle and stitch ends to close.

(5) Decoupaged Design - glue on some paper cut-outs to the face of a bangle and coat with several layers of Mod Podge. Allow to dry before use.

19 September 2012

Wrist Candy

The same way interior designers assemble vision boards when developing looks for the home, I like to put together images for my blah to TADA! crafting.

Today, I'm thinking of ways to use up some embroidery floss from this project. Here are more ways to turn the humble thread into fashion accessories:

Wrist Candy

1/2/3/4/5

(1) A bevy of beads - string some beads on several strands of thread, while making knots in between each bead. Finish off with a tassel and a favorite charm.

(2) Bangle Fest - give plain bangles a new look by covering them in different colors of thread and securing the edges in place with a glue gun.

(3) Braided Cord - braid or crochet long strands of thread to create this piece that can be used as a necklace or bracelet. Decorate the ends with tassels or small pendants.

(4) One Word Affirmations - find a charm of your favorite word {rescue this from an old necklace} and string this on thread in your favorite shade. Wear this daily and believe in its power. 

(5) Color Collection - Braid different hues of thread into a long necklace or multi-strand bracelet, and hook on a few charms. A warning -- your friends might drool with envy when seeing this!

18 September 2012

Black Patent Clutches

I love me a little black clutch. They are so versatile for a casual or dressy night out. I've made a few here, here and here.

But let's say you had a blah patent clutch in great need for a make-over. Here are several ideas we can use to make it TADA!:


Black Patent Clutches

1/2/3/4/5

Add some polka-dots or fun sketches with a permanent marker in white or silver!

More inspiration boards tomorrow... until then, have a spectacular day!

17 September 2012

Pretty Pillows

Hi there everyone! I hope you had a nice weekend. This week, I'm making a few inspiration boards for future gifting projects.

Today's theme is "throw pillows". They add color, comfort, and coziness to a couch or bed. Where I live, they can be quite pricey, so maybe I'll try my hand at making a few to give as wedding gifts or hostess presents.

Cute Pillows

1/2/3/4/5

Here's how I'd make these my own:
  1. Special Words - use a fabric pen and alphabet stencil {with the aid of a ruler} to write a favorite verse, family motto, or even wedding vows to a plain pillow cover.  
  2. Print on print - add a hand-stamped image using craft stamps and fabric paint or silk-screen an image onto a printed cushion case. 
  3. Black and white with a little bit of color - find a fabric with whimsical black and white images that will be sewed as a pillow cover. Color some areas of the images with fabric paint; allow to dry.
  4. A favorite word in felt - choose a favorite word {like "love" or "joy" or "smile"}. Write this on felt and make a cut-out with precision scissors. Sew this onto a bright-colored pillow case.
  5. Heart-y Party - add some color to a blah cushion cover by sewing on some felt or fabric cut-outs to make it TADA!

14 September 2012

Friendly Felt

A final photo inspiration before we jump 
into the weekend:

Don't these greeting cards crack you up? They are characters made of felt that can be turned into magnets once the card is read. Blah to TADA!, if I should say so myself. Plus each one has a witty name: Umbrella Ella, Wesley Whip, Cup-Katie and Tequila Terry.

I would love to make these little toys with fabric remnants or felt scraps, embroidery thread, and stuffing from an old pillow or dryer lint. Hot glue a magnet at the back, or sew on a safety pin for a cute brooch for a little lady. The matching card can be recycled from an old gift box -- crafting and recycling at the same time!

Wishing you a very inspiring weekend!

13 September 2012

Glue, Cut, Sketch

They say, you can find inspiration anywhere. It's really true and this week, I'm gathering creative cues from the greeting card aisle.

Here's one for a couple expecting a baby:

I love how this can be made using plain card stock and freehand cut-outs of clouds. The words are hand-written with a black pen and the innocent sketch can be be filled in with watercolor. The best part of this card is the pompom trim, secured around the card with hot glue.

Have a blissful Thursday!

12 September 2012

Cuteness Overload

When time allows it, I like making my own birthday cards. I send them to a select number of friends every year. And every year, I am rewarded with grateful texts or e-mails all because of a simple gesture.

A walk down the card aisle has given me lots of inspiration for the birthday cards I'll soon be making. Here are more pictures:

How lovable are these animals/creatures bearing gifts? I especially love the googley eyes! Maybe I'll incorporate some of these eyes in a card for a goddaughter's birthday or for a little fella turning a year older.

These cupcakes can't be eaten but they last without refrigeration! Let's make our own with jewel stickers, glitter paper, and micro-beads glued on cardboard. Just what you need for a birthday -- sweetness and sparkle!

11 September 2012

For Baby

I've secretly taken some photos of cute cards at the greeting card section. Okay, so maybe my paparazzi attempt isn't so secret since there are surveillance cameras all over the store. But I tried to be as discreet as possible, I promise!

Here's what I have for 'ya today: 

It's a congratulatory card for parents of a baby boy. I think we can create something similar with plain card stock. Colors can be added to the card using paint, the edges achieved with scallop scissors, and the salutation with a marker. The bunny slippers is a blah to TADA! sewing project. Make them with old towels or kiddie bibs that have seen better days. Eyeball a pattern, cut, tuck, fold and then sew! Hand-stitch the faces using black embroidery thread, and attach to the card with hot glue.  So adorable, yes?

10 September 2012

Photo Inspiration

Happy Monday Lovelies!

Last week, I found myself at the greeting card aisle of my neighborhood department store.  It's not very often that I make a stop here since I like making my own cards, or sometimes, I get them at a warehouse sale.

This week, I'll show you some of the cards that caught my eye. Maybe we can use them as inspiration for future card making?

Doesn't the addition of balloons make any celebration extra fun? Make balloon shapes and letter cut-outs from gift wrap remnants and glue these to card stock. Embellish with yarn/colorful string and shiny stickers.   

Here's another option for a friend who's bag-obsessed:

Replicate these little bags using colored paper or magazine pages. Make two-dimensional ones with felt or fabric scraps. Strips of cord or ribbon ends act as the handles, and bling-y stickers fancy them up. Take note that the edges of the card were run through a sewing machine for added flavor.

Don't you think these are TADA!? See ya'all tomorrow!

07 September 2012

The Power of Paint

Hooray, it's Friday!

All this week, I featured projects from the September issue of Martha Stewart Living Magazine. Here's a final turn of the pages, in case you're fancying a home make-over. 

All you need is some bold paint color.

Liven up a closet with the shade of sunshine.

A punchy statement in the bathroom with a 
painted dresser and colorful floor tile.

Afraid to commit to a vibrant color? Then focus
on a corner like the foyer, hallway, or bar area.

Whatever your plans are, I hope you'll
have lots of fun this weekend!

06 September 2012

Pompom Party

Happy Thursday!

Last year, I made a few pompoms with yarn I found in a garage sale, and cardboard rings detached from a ribbon spool. I turned my pompoms into a key chain, dressed up a beanie, and provided a colorful head of hair to some pens.

What a pleasant surprise to see pompoms in the September issue of the Martha Stewart Living Magazine! 

The editors have provided sophisticated ways to use pompoms, like adding an unexpected element to throw pillows. 

Or to add color and dimension to a lamp shade.

Decorate desk-top storage canisters with pompoms.

And heighten the soft and cuddly factor to a 
blanket by adding giant ones! 

There's also a pompom tutorial and a lesson 
on the different kinds of yarn you can use,
which I think is TADA!

05 September 2012

Bowls and Dishes

I love magazines! At the airport, I'll while away the time at the magazine shop. When I'm at the bookstore, the magazine section is where I spend a good amount of time. I usually flip through the pages to decide if I'll buy them. If not, I'll speedily read through the articles I like, and leave without purchase, saving me $5.00.

The September 2012 issue of Martha Stewart, I just had to buy. There are wonderful ideas and recipes that I want to try.

If you have some bowls and dishes that are hiding in the cupboard, why not experiment with these:

Turn them into footed bowls to keep 
frequently-used jewelry.

Assign several for appetizers and dip.

Or use them to display desserts. 

Keep some by the sink in the 
kitchen or bathroom. 

Put the pieces together with adhesive. 

You'll find some that I made here, here, here, and here

An easy blah to TADA! that will allow 
neglected dining pieces to shine. 

04 September 2012

Playing with Prints

Thanks for dropping by today!

I've been perusing the latest issue of Martha Stewart Living, and I'm really enjoying the articles and how-to's in each page.

Here are some projects that are right up my blah to TADA! alley: 

Glam up your blank walls {great for dorm rooms} with textile wall art made of fabric scraps and canvas/artist's panels. Simply attach the fabric onto the panel using a staple gun. Hang it on your wall, and you're done! 

This is my version using an old but well-loved t-shirt.

Another cool idea from the magazine is to add visual interest to your staircase...with wallpaper! Who says wallpaper is only for walls?

And because I love discovering lovely little shops in New York City, I'll be visiting the ones that Kevin Sharkey frequents in his article, "Love at First Sight".

See you tomorrow!