16 July 2013

Photo Booths are Tada!

When planning the layout for a party, why not include a "photo booth"? It's an area where groups can gather for posterity shots, and a fun excuse to use the props we made yesterday.

To dress up this section of the party space, here are a few ideas:

via Green Wedding Shoes
A blackboard backdrop is a simple way to remember the day. Have extra chalk on hand to write sweet notes or silly messages.

via Ruffled
A dreamy flower arch made of coffee filters can dress up a plain white wall. Find out how to make one here.
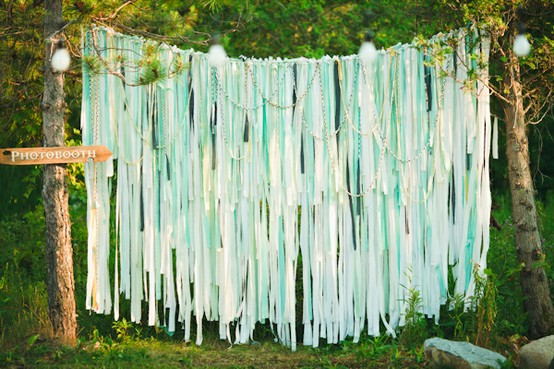
via Wedding Bee
Craft a curtain out of ribbon or strips of fabric. I recommend material that has some weight to it, as opposed to crepe paper or tissue paper stands, especially if this will be placed outdoors. Paper will be too delicate for wind or a light drizzle.

via Style Me Pretty
Wallpaper or a large piece of fabric tacked to the wall instantly defines a photo space.

via dropitmodern.com
Or purchase these special photo backgrounds in super cute prints if you throw a lot of parties.

If you're on a budget, read this for blah to TADA! ways to dress up a photo booth.

15 July 2013

A Few Party Ideas

Parties and weddings are never complete without photos. They make for good souvenirs and are proof of a memorable celebration. 

Photo Props Kit from Paper Source
When I spotted these photo props, I knew I just had to have them for our gatherings. They're very inexpensive but in true frugalista fashion, I decided to DIY instead of buy.

blah: a cardboard gift box and a few chopsticks  

 Exercise some drawing skills on the cardboard.

Add a few coats of paint. 

Cut around each piece {make spaces/holes where necessary} and attach to a chopstick with hot glue. TADA! -- instant photo accessories!

Assemble them in a jar by a designated photo area and encourage guests to ham it up! 

12 July 2013

Tuck It In

A final idea to turn manila tags from blah to TADA!

Whether you purchase some from the office supply store or make your own using cardboard,  these manila tags serve as a blank canvas to be wildly creative.

My favorite medium lately has been watercolors. I'll use my paint to make a fiesta bunting.

Then I'll glue on a pocket that I made out of scrap paper.

Here's what it looks like. 

Then I'll write a heartfelt letter. 

Fold the letter up, tuck it into my tag/envelope and tie everything to a bouquet of flowers. TADA!

Have a spectacular weekend everyone!

11 July 2013

A Little Stitch

Manila tags are very functional for organizing boxes filled with stuff. 

They're also awesome to prettify packages.  

With a needle and thread, I'll turn this blah tag into TADA!

Draw a pattern with pencil and "trace" around it with simple stitches. 

TADA! -- a unique gift tag. All we need to do is write the recipient's name or a short message inside the lines. Have a great day!

10 July 2013

A Cheerful Gift Tag

Happy Wednesday!

On Monday, I did a little demo on making manila tags out of cardboard. They're quite simple and even the craft-challenged can successfully make them. What's more fun is the decorating part.

Today, I'll use an image rescued from this empty tea box. 

Just cut around the delicate chamomile flowers and attach to the manila tag. Use glue or even mounting tape for a floating effect. 

A cheery gift tag that will turn any plain gift from blah to TADA!

09 July 2013

Dainty Dots

I scored some Martha Stewart manila tags at a very sweet price.

They're begging for a blah to TADA! makeover, don't you think? 

I waved my watercolor wand and here's what I've come up with. 

Decorated with dainty dots -- perfect for a baby shower gift!

08 July 2013

DIY Gift Tags

Thank you for your visit today! This week, let's make gift tags.

I was inspired to make some when I found a package of these Martha Stewart manila tags at Staples

It comes in a pack of six and they were on clearance for only 50 cents a pack. Woot! Woot! 

Now, if you can't get them in your area, they're super easy to make:

All you need are cardboard and basic supplies. 

Cut them in your desired size and shape. 

This is optional, only if you want them to look like typical manila tags: embellish with a sticker label {or scrap paper}. Make a hole in the center with a punch.

Then tie on some twine or ribbon remnants and you've got yourself some handsome manila tags. TADA!

Stop by everyday this week to see how they can be transformed from blah to TADA!

05 July 2013

Fist Bumps

Whether it's store-bought or homemade, a cake is always a welcome companion to any celebration. But sometimes, it needs a little blah to TADA!

I'm making one last cake topper using plain old cardboard.

Create a border with an image from a rubber stamp and an ink pad. 

Now time to write down congratulatory expressions. 

Position these on your cake with a toothpick. 

You can do this on doughnuts, too. 
Or truffles. Or macarons. Or cookies.

Or scoops of ice cream!

Cake and congrats...I think these are TADA!

Have a happy weekend!

04 July 2013

Just Like Sparklers

How are you on this delightful Thursday?

Today I'm using these simple materials to turn blah into... 

...TADA! 

I fashioned the tulle and stripey straw to look like sparklers or magic wands -- a nod to birthday wishes! 

I cut the tulle into small rectangles, gathered a few on top of each other and sewed the middle to form a little pompom. Then I used hot glue to attach it to the end of the straw. I fluffed the tulle and glued some of the ends to the straw to keep its ball-like shape.

I opted not to add the red ribbon because these look festive enough for any celebration, even the Fourth of July. TADA!

Enjoy the picnics and fireworks everyone!

03 July 2013

Birthday Bunting

Here's another fun and fast way to decorate a cake or set of cupcakes.

 We will need paper, scissors, alphabet stamps, 
an ink pad and twine.

Spell out the guest of honor's name. 

Attach the mini flags to the twine with hot glue.
Tie each end of the bunting to a skewer and
anchor the skewers to the cake. 
TADA!

Precious and personal...isn't that what celebrations are about?

02 July 2013

Love-ly Cake

I'm in the mood to make a few hearts.

 I'm using this mini cookie cutter to help me out.

Color them with red paint. Allow to dry and cut around each one.
                         
Attach the hearts to a chopstick {trimmed to size} with hot glue. 
Then position randomly on a cake.

 TADA! A simple cake decoration
that's all about love!