19 July 2012

Beaded Band

Hello! I've got another DIY bracelet to share with you. 

blah: cotton rope rescued from an old shopping bag,
and some metal fixtures

Divide the rope into four, and insert the metal fixtures.
Position them on both ends; we'll use these as
a closure mechanism.

This hook clasp came from a blah lanyard {you know, 
those things you use to wear your ID around your neck}. 

This ring came from a blah necklace. 

Sew the ends of the rope to seal them, and sew the 
individual strands together to create a thick band.  

I found some of these colorful beads in my stash... 

...which I then hand-stitched to my band. 
I chose to make lines, but the possibilities are 
endless -- chevron, diagonal stripes, circles.

The lines made of beads go all the way around. 

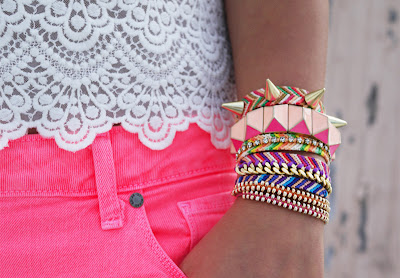
TADA! My take on the friendship bracelet! 

When stacked, I use a mix of my enamel and  
colored glass bangles.

Have a happy Thursday!

18 July 2012

Dark and Dainty

It's all about do-it-yourself bracelets this week on blah to TADA!

Today's peg is a bracelet I saw while on the subway. A young lady beside me wore a stack of colorful wrist pieces. The one that caught my eye was made of a skull with crossbones, flanked by salmon-colored beads. I loved the contrast of something dark, with something sweet and dainty. I had to make one to call my own.

I used pink beads, remnants from a blah, broken necklace. 

I found my diamond-encrusted skull and crossbones at a New York City bead shop. I got it for $2.50.

I assembled my bracelet using this clear, stretchy cord {I used two strands}. I finished it with tight knots. 

 TADA! A new bracelet made from an old necklace.

 Cute contrast

Pink and silver party!

17 July 2012

Modern Ethnic

Thank you for stopping by today! This week, I'm making a few fun and fabulous bracelets.

via Holst + Lee

Today's inspiration comes from the S/S 2012 collection of Holst + Lee, handmade by two spunky women designers based in Brooklyn.

via Holst + Lee
I think using blocks of primary colors with gold accents is quite attractive. There's a modern ethnic feel that commands attention. 

For my version of Natalie Holst and Rochelle Lee's bracelets, here's what I'm using:


blah: an empty paper bag 

I'll be using the straps of the bag. 

It's a cotton rope that's both sturdy and pliable. 

 It's 32 inches long, which allows me to fold it in half and make knots in two areas.

I bought different colors of embroidery thread a few months back {they were on sale too!}. I got them with no specific agenda in mind, but today is the day I put them to use.

Wind a good amount of the embroidery thread around the rope following this process: start with a double knot, create a generous row {wind tightly} while covering the first knot, and end with another double knot. Cut the end of the thread but leave a small tail. Cover the knot and tail as you build another block with thread in a new color. 

Here's what it looks like now. 
Notice that I left an opening at the center. 

I sewed on a few silver beads to add some weight and sparkle.

Insert the tails into the loop and make a few knots to secure. 

 TADA!: My version of the modern ethnic bracelet 
worn alone...

...and stacked with a bunch of other bangles.

More ideas tomorrow!

16 July 2012

DIY Bracelets

I hope you had a TADA! weekend, dear friends! 

I've been seeing a lot of DIY bracelet how-tos in a lot of blogs. They're worn in multiples by fashionistas, and sold in many shops. Here are just a few samples I've seen:

via A Merry Mishap
Made with thread and brightly-colored beads 

via Etsy
 A mix of modern and old-fashioned with crochet on a chain

via Honestly WTF
Friendship bracelets with an updated twist

We'll, I've joined the bandwagon and I'll be making my own. My version: blah to TADA! of course, using recycled materials. See you tomorrow for one of many DIY bracelets. Have a nice day!

13 July 2012

S'mores!

Hello and Happy Friday! I hope my entries this week helped you re-live your experience in camp. If you didn't go to camp, maybe they'll inspire you to go out and explore nature more.

Today, I was attracted to this photo of s'mores in the Camp Design Sponge newspaper. S'mores are snacks composed of a chocolate bar and a marshmallow sandwiched in between two graham crackers. When eaten around the campfire, the marshmallows are toasted before the sandwich is built, making it gooey soft, melting the chocolate in the process. These treats are so yummy, you'll be saying, "Some more!" -- and that's how it got the name "s'more".

I was craving for a s'more and I just had to up the difficulty factor by making my own marshmallows. 

I followed a recipe from this book by Alana Chernila that I serendipitously found at the library. Here's what we'll need:

Canola oil for the pan and the knife
2/3 cup water
3 envelopes (3/4 ounce) unflavored gelatin
1/2 cup water
1/2 cup granulated sugar
3/4 cup Lyle's Golden Syrup (this replaces light corn syrup in traditional recipes)
1/4 teaspoon salt
1 teaspoon vanilla extract

Lightly grease a square pan. 

Pour 2/3 cups water in the bowl of a stand mixer, then sprinkle the gelatin over the water. Let stand until the gelatin has turned from powder to gel, about 5 minutes.

In a medium saucepan, combine 1/2 cup water, the sugar, syrup, and salt. Clip a candy thermometer onto the side of the saucepan and cook over medium-high heat without stirring until the mixture reaches 250 degrees F. 

With a wire whip attachment, start the mixer on low speed. Slowly and carefully add the hot syrup to the gelatin. Add the vanilla. 

Increase the speed on the mixer, beat for 10 to 15 minutes, or until the mixture becomes thick, bright white, and shiny.

TADA! Thick and glossy white! 

Transfer the mixture into the prepared pan, and smooth the top with a spatula. You have to work quickly because it sets pretty fast.

Let the marshmallows sit, uncovered at room temperature, for at least 12 hours. 

Turn the marshmallows out onto a counter. Cut into squares or rectangles (yield is twenty 2-inch marshmallows). You can dust them with powdered sugar before eating. Store them in a covered container at room temperature for 3 weeks or in a freezer-safe container/bag for 3 months.

I like how imperfect they look. They're not sugary sweet, and when you chew it, there's no resistance... it slowly melts in your mouth.  Eat them alone or turn them into s'mores:

Graham crackers (did you know they have it in chocolate?!) + chocolate bar or Nutella + marshmallow = superb s'mores

They're good as is, but even better when the marshmallows are toasted! 

Here's another version where one side of the sandwich is dipped in chocolate. Yummmmm. 

And a deconstructed version: marshmallows on a stick, dipped in chocolate, and rolled in crushed graham crackers.

This makes a delightful party favor, too.

May you have a weekend that will keep you saying, "Some more!" See you Monday!