04 November 2013

American Made

Did you have a nice weekend my dears? Autumn is in full swing in my part of the world. That means the weather's chilly and the leaves are showing off fall's finest colors.

In mid-October, I went to a beautiful craft fair in New York's Grand Central Station. I found it so inspiring, I wanted to share the highlights with you.

The fair was called Martha Stewart American Made. It honors those who revive lost art forms and pioneer new industries. It celebrates small businesses and artisans, handpicked by the editors of Martha Stewart Living, who are turning well-designed goods into a way of life.

You know you're in for a treat when there are free sugar cookies!

Lots of free samples like baked goods, pickles, cold cuts, tea and spreads.

There were a handful of crafting tables so guests could try Martha Stewart's craft supplies. Employees of the company were on hand to demonstrate use and cheer on everyone willing to try. 

There was also a mini market showcasing handcrafted items from all over the US. Accessories and jewelry, food and drink, home goods and decor, paper goods and personal care products were well represented.

There were also a lot of DIY demos and book signing providing great audience interaction.

Tomorrow, we'll take a peek at the companies honored during the event. See you then!

01 November 2013

Stamped and Flocked

I hope you guys had an exciting Halloween!

Today, another use for flocking powder but without the Halloween theme.

I'll use it to dress up some plain card stock -- my take on personalized stationery.
 
Traditionally, flocking powder is used for stamping projects. Aside from applying rubber stamps to ink pads, they can be applied to glue pads. The rubber stamp {now with a layer of glue} is pressed onto paper. The image is then showered with flocking powder, resulting in a velvety design.

I'm going to attempt to do this with the resources I have.

First, I decided on which part of the card stock I wanted the image. Then I marked the center with the help of a ruler and pencil.

Because I don't have a glue pad, I'm experimenting with tacky glue that I poured on a flat lid.
 
I set-up my work station by lining it with scrap paper {flocking powder will yield a mess}.

I gently immersed my rubber stamp into the shallow puddle of glue.

I cleaned up the excess glue from the edges of the rubber before stamping it on my card stock.

I piled on the flocking powder so that the entire design was covered.

I tapped out the excess flocking powder and here is the result. My technique doesn't quite capture the scalloped details of the border and the thin edges of the letter O.

I tried it again with this "love birds" rubber stamp.

A thick dusting of flocking powder.

Still the fine details do not come out.

But I still have a homespun greeting card just the same. TADA!

31 October 2013

Happy Halloween!

Hello there! I'll be busy handing out candy and checking out fun costumes so we'll skip the crafting today. But here's something TADA! I have to share with you:

I spotted this at Whole Foods. It's a haunted house made out of recycled cardboard boxes!

I just love the shingle style exterior.

The details of the roof, walls and windows are exquisite.

I envy the ghost who lives here.

Have a spook-tacular Halloween, everyone!

30 October 2013

Secret Identity

Do you dress up for Halloween? Do you think Halloween is blah or is it TADA!? Here's a low-commitment costume that doesn't cost much and hopefully, as you make it, will get you in the spirit of this special day. 

Today's blah: a white cardboard box. 

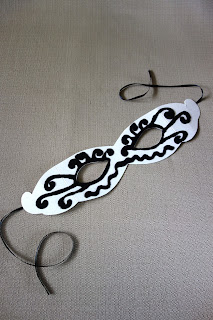
With a pair of scissors, it's instantly transformed into TADA!

Here's another version in a shape befitting a superhero. Or bandit. Depending on the look you're going for.

I'm embellishing it with some squiggles of tacky glue.

Then, on a surface covered with scrap paper, I'll cover the mask with flocking powder. Glitter or confetti are other alternatives.

The flocking powder should attach to the glue. When the excess powder is tapped out, we'll have these fun designs on the mask...TADA! 

The scrap paper keeps our craft table neat and it also catches all the excess powder. Form the paper into a cone and return the extra flocking powder into the jar {because wasting is blah}.

Add ribbons to secure the mask around the head...

 ...or rubber bands inserted into holes made with a craft punch.

Pair the mask with an all-black outfit and TADA!, Halloween party here we come!

29 October 2013

Bats on a Bag

This week, we're playing around with flocking powder:

It's a crafting material that, when applied to an adhesive, produces a velvety surface. 

Let's see how we can dress up this blah paper bag to make it Halloween ready.

I've chosen a bat design. It can easily be drawn freehand, but since I have this cookie cutter, I'll use it as a stencil.

We'll outline the bat with flocking powder, beginning with all purpose glue placed over the pencil drawing.

Followed by a shower of flocking powder {don't be stingy since the excess can be returned to the container}. 

By the way, make sure your table is lined with scrap paper to catch any loose powder.

Tap out the excess powder and use a paintbrush to get rid of any stubborn flecks.

It's easy to use a marker, crayon or pen to draw these bats, but the flocking powder adds a felt-like finish. 

TADA! This bag is all suited up for Halloween candy!

28 October 2013

Ideas for Halloween

Good to see you today! This week, let's experiment with a different kind of craft material.

Have you ever heard of flocking powder? I can best describe it as microscopic glitter but instead of a sparkly look, it gives a surface a velvety finish.

Since Halloween is coming up, let's see how we can use flocking powder to dress up some crafts.

Let's turn these blah book pages into TADA! 

Fold the book pages into pouches and secure the edges with glue.

Using all purpose glue, draw creepy-crawlies on the pouch.

Make sure to cover your work space with newspaper/scrap paper.  Working quickly, shower the drawing with a generous amount of flocking powder. 

Tap out the excess. If there are "bald spots", add more flocking powder.  The excess powder can be poured back into the container.

I'm not sure if you can see it here, but the spider looks and feels like velvet. The flocking powder adds not only texture, but dimension as well. The spider looks embossed!

Fill the pouches with tricks and treats {fold the top and secure with a sticker or tape} and they're ready to be given away on Halloween. TADA!

25 October 2013

Paper Cuts on Cards

Handmade greeting cards are as satisfying to make as to give away. I've experimented with basic paper cutting but would love to make intricate ones that breathtakingly turn a blank sheet of paper from blah to TADA!:

via etsy

You Are My Sunshine Card  - Paper Cut Painted Yellow
via etsy

New Apartment Customizable Papercut Card
via etsy

Merry christmas handmade papercut greetingcard - Christmas greeting card  and gift in one - Christmas pendant - Christmas papercut giftpa
via etsy
Lovely, aren't they?

I wish you all an exciting weekend!