21 September 2011

DIY Blooms


This week, we're dressing up presents
with flowers made out of plastic bags.
This way, we don't need to buy ribbons &
we get to recycle too. Plus the gifts
turn out quite appealing, I have to say.

blah: an orange plastic bag

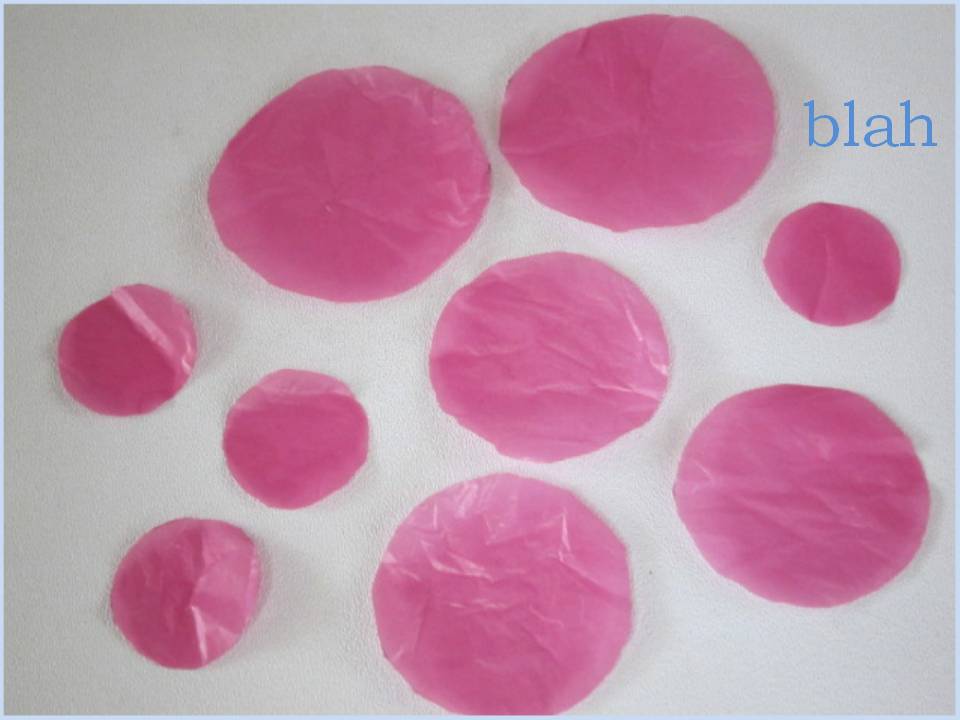
Draw a few circles on the bag.

Cut out the circles and if you want,
make a ruffle on the edges.

Make a few circles out of cardboard.
These are about one inch in diameter.
Punch a hole in the center.

Layer 5 plastic circles on top of each other, then form
them into a cone. Insert the end of the cone into the
hole of the cardboard circle.

Staple the plastic ends onto the cardboard circle.
Reinforce with hot glue.

Flip them over and fluff up the petals.
TADA! You made carnations!

With hot glue, attach the carnation to a clothespin.
You'll see that there are cheerful words
written on the clothespins.

This is all you need to add pizzazz to a simple package.

This can be used by the recipient
for future gift giving. Or just add a
magnet at the back of the clothespin &
it becomes a fridge magnet/note holder!
TADA!


20 September 2011

A Corsage for your Package


I take my own tote bag on shopping trips but
I still have plastic bags at home. I use them to
line our garbage cans...I know, there has to be
a more environment-friendly solution to this.

I set aside the most colorful ones.

They're awesome to turn
from blah to TADA!

This week, I'm turning them into
decorations for presents, like so:

Aren't they lovely?

Here's how you can make them at home:

Aside from the bags, you'll also need some cardboard
{I'm re-using these empty ribbon spools}, a stapler,
hot glue and scissors.

Fold each bag to make about a one-inch strip.

Staple one end to the cardboard and
twist the plastic bag into a coil.
As you do this, attach the underside
of the plastic to the cardboard using
a glue gun.

Here's what the coil will look like.

Repeat the process with another
plastic bag.

Now you have two!

If you still have space on the cardboard, add
another one or a few more coils or "flowers".

I think three is a good number.
{I had to trim the last plastic bag for it to fit}.

Add some leaves & some beads and trim any
cardboard that sticks out.

Then attach this to a wooden clothespin.
{I got a whole bag from the dollar store}.

Clip it like a corsage to brown paper packages,
to elevate them instantly from blah to TADA!

19 September 2011

Gift Embellishments


Happy New Week Lovelies!
I hope you had a memorable weekend.

Do you remember this project?

I made a gift topper out of plastic bags.
With some upcoming birthdays and the holidays
fast approaching, I wanted to create a few
more of these gift embellishments.

Who doesn't love a beautifully-wrapped present?
I'm a sucker for beautiful gift wrap & ribbons
but they can be quite expensive. So I do the
next best thing: blah to TADA!

blah: a pink and green plastic bag

Draw circles on the pink plastic. Use different round objects
you can find at home (ex. yogurt container, cans,
jars, etc.) to make at least three
different-sized circles.

Cut around the circle, making sure to cut away
the ink marks.

Slide the edges of the plastic circle against the sharp side of
a pair of scissors {ideal position: your thumb, plastic circle,
scissors}. This will produce a soft curl, mimicking a petal.
Do this on four sides of each circle.

Layer the circles on top of each other,
biggest to smallest.

Then make leaves out of the green plastic bag.

Attach them together by hand stitching and
adding a pearl or bead at the center.
Now you've got a pretty flower. TADA!

Attach the flower to a clip {rescued from an old ID badge}
using hot glue. That way, this gift topper can be used
over and over again.

Just clip it directly to your gift or on a piece of
string or ribbon.

Encourage your friends to re-use this ribbon
or teach them how to make it!

Enjoy your day!

16 September 2011

India-inspired


Yipee, yay, it's Friday!

This week, we came up with TADA!
solutions to answer the question,
"How can I recycle old jars?"

I've got one more idea up my sleeve:

blah: a lonely glass vase

blah: bold-colored tissue paper that were once
used as gift wrap

We're using this as inspiration: Indian block prints
from West Elm's latest collection

Trim the tissue paper to fit around the vase
{add an extra inch so we can glue the edges
together later on} and draw a pattern.
You can do this freehand or trace it from
a source. Finish with permanent ink.

TADA! Here's the red version.

A votive candle will make it glow.

Here's the blue version.

Add current design trends to your home
without spending a cent.
I think that's TADA!

Have a spectacular weekend!

15 September 2011

Lots of Character


I've got this uber cute planner
decorated with Hello Kitty and her gang:

Of course it's made up of calendar pages but
there's a bonus at the back.

A few pages of stationery with perforations for easy tearing.

One side looks like gift wrap...

And the other side has a generous space
to write a thoughtful note.

But here's another way to use
these strips of fun paper.

Take out those blah jars hiding in
the cupboards.

Roll the paper and put it inside.
TADA! You've got yourself an
adorable jar!

Fill it with straws for your next
milk shake soiree.

Here's another idea:

Cut out your favorite designs & glue them on the jar.

Then you can fill them with lollipops
for your next kiddie party!

Go ahead and experiment with gift wrap
remnants too.

Enjoy your day!