16 July 2012

DIY Bracelets

I hope you had a TADA! weekend, dear friends! 

I've been seeing a lot of DIY bracelet how-tos in a lot of blogs. They're worn in multiples by fashionistas, and sold in many shops. Here are just a few samples I've seen:

via A Merry Mishap
Made with thread and brightly-colored beads 

via Etsy
 A mix of modern and old-fashioned with crochet on a chain

via Honestly WTF
Friendship bracelets with an updated twist

We'll, I've joined the bandwagon and I'll be making my own. My version: blah to TADA! of course, using recycled materials. See you tomorrow for one of many DIY bracelets. Have a nice day!

13 July 2012

S'mores!

Hello and Happy Friday! I hope my entries this week helped you re-live your experience in camp. If you didn't go to camp, maybe they'll inspire you to go out and explore nature more.

Today, I was attracted to this photo of s'mores in the Camp Design Sponge newspaper. S'mores are snacks composed of a chocolate bar and a marshmallow sandwiched in between two graham crackers. When eaten around the campfire, the marshmallows are toasted before the sandwich is built, making it gooey soft, melting the chocolate in the process. These treats are so yummy, you'll be saying, "Some more!" -- and that's how it got the name "s'more".

I was craving for a s'more and I just had to up the difficulty factor by making my own marshmallows. 

I followed a recipe from this book by Alana Chernila that I serendipitously found at the library. Here's what we'll need:

Canola oil for the pan and the knife
2/3 cup water
3 envelopes (3/4 ounce) unflavored gelatin
1/2 cup water
1/2 cup granulated sugar
3/4 cup Lyle's Golden Syrup (this replaces light corn syrup in traditional recipes)
1/4 teaspoon salt
1 teaspoon vanilla extract

Lightly grease a square pan. 

Pour 2/3 cups water in the bowl of a stand mixer, then sprinkle the gelatin over the water. Let stand until the gelatin has turned from powder to gel, about 5 minutes.

In a medium saucepan, combine 1/2 cup water, the sugar, syrup, and salt. Clip a candy thermometer onto the side of the saucepan and cook over medium-high heat without stirring until the mixture reaches 250 degrees F. 

With a wire whip attachment, start the mixer on low speed. Slowly and carefully add the hot syrup to the gelatin. Add the vanilla. 

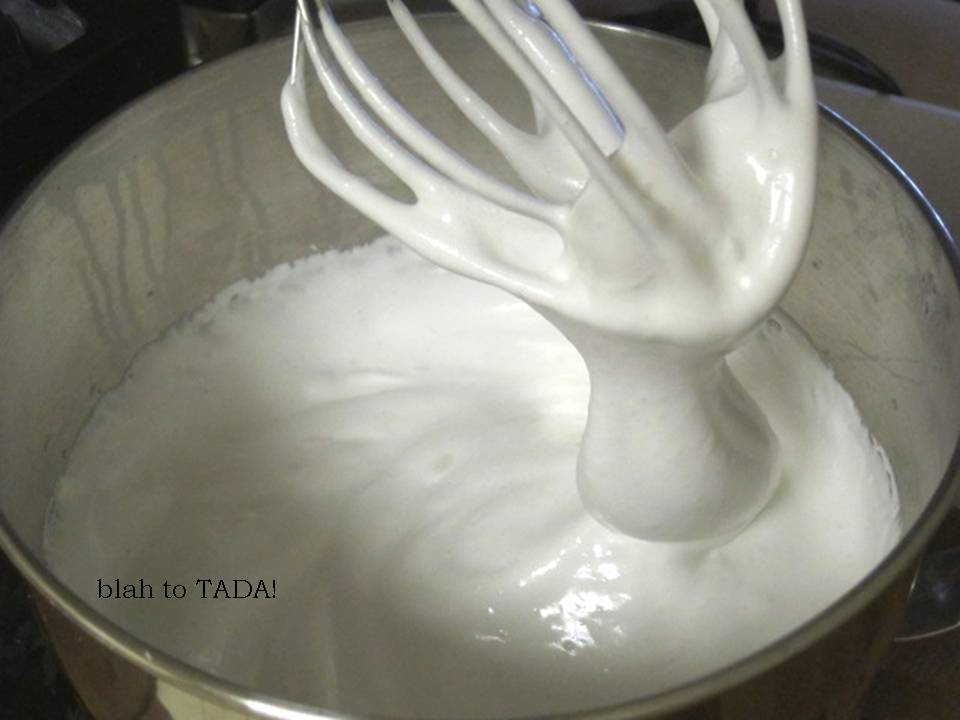
Increase the speed on the mixer, beat for 10 to 15 minutes, or until the mixture becomes thick, bright white, and shiny.

TADA! Thick and glossy white! 

Transfer the mixture into the prepared pan, and smooth the top with a spatula. You have to work quickly because it sets pretty fast.

Let the marshmallows sit, uncovered at room temperature, for at least 12 hours. 

Turn the marshmallows out onto a counter. Cut into squares or rectangles (yield is twenty 2-inch marshmallows). You can dust them with powdered sugar before eating. Store them in a covered container at room temperature for 3 weeks or in a freezer-safe container/bag for 3 months.

I like how imperfect they look. They're not sugary sweet, and when you chew it, there's no resistance... it slowly melts in your mouth.  Eat them alone or turn them into s'mores:

Graham crackers (did you know they have it in chocolate?!) + chocolate bar or Nutella + marshmallow = superb s'mores

They're good as is, but even better when the marshmallows are toasted! 

Here's another version where one side of the sandwich is dipped in chocolate. Yummmmm. 

And a deconstructed version: marshmallows on a stick, dipped in chocolate, and rolled in crushed graham crackers.

This makes a delightful party favor, too.

May you have a weekend that will keep you saying, "Some more!" See you Monday!

12 July 2012

Searching for Stars

Stargazing is a simple summer night pleasure. Growing up, I anticipated seeing the first star of the evening, which meant I got to make a wish! Then I moved on shooting stars, and eventually identifying constellations.

The Camp Design Sponge newspaper provides a guide for stargazing. While it doesn't tell you the names of the constellations, it helps you to know what to look for. Take this page and a flashlight with you one evening, and see how many forms you can find.

Constellations make an enjoyable crafting theme. With just blah dots, a significant shape is created, and TADA! you've formed Virgo, Orion, Andromeda... 

Below are crafting kits I found on Etsy that anyone can put together this summer.

via Etsy
This zodiac sign embroidery kit is simple enough even for novice sewers. Once completed, keep it as a souvenir from your summer or give it away as a present.

via Etsy
The fabric is already pre-printed, and it comes with everything you need -- instructions with stitch guide, needle and thread, an embroidery hoop, and an extra piece of fabric to practice your French knots on. 

via Etsy
Here's a DIY pillow kit with a constellation design. This project is ideal for those learning how to use the sewing machine. 

via Etsy
It comes with the fabric and instructions. Just sew 'em up, add a cushion, and TADA!, a starry accent for your couch or bed.

via Etsy
Another seller has put together a star constellations vintage paper pack  gathered from old books. I would use these for collages, decoupage, and scrapbooks.

via Etsy
So even if the sky isn't clear or if the weather isn't for laying on the grass to wish upon a star, these crafts guarantee that stars will be out anytime you want.

11 July 2012

A Scavenger Hunt

The crafty ideas on blah to TADA! this week come from the Camp Design Sponge newspaper:

I fell in love with the special edition publication when I saw it at an Anthropologie store. It felt so old school: a newspaper {most of the reading material we get these days can be downloaded with the click of a button}, stories about camp {as opposed to kids stuck in doors in front of some kind of digital screen}, plus the typewriter/handwritten fonts and pencil-sketched images used in the design. While you can order it on-line, there's some effort involved to obtain it. Once you have it, you feel a certain thrill.

The pages encourage exploration {outdoors, in the kitchen or the craft room} and one of the activities is a scavenger hunt. 

One is all about beach finds.

Another is for the park or forest.

What a brilliant idea, this scavenger hunt! Even if a beach trip or a hike in the woods aren't in your immediate plans, you can definitely do this at home, especially if it's too hot to go outside, or if it's raining, or if your children are driving you up the wall. Let me show you how:

blah: an empty paper bag 

 TADA!: make your own indoor scavenger hunt!

Customize it based on the ages of your children. You can write out the items or use pictures for the little ones who can't read yet. Go through the rules so that everyone understands how the game is played {Will you have a time limit? Which parts of the home will the hunt take place? Will an adult buddy up with a child? What's the prize?}

Prepare a bag for each child {you can have them find different items so they don't fight} and attach a marker on a string.

Put the found items inside the bag and cross them off the list as you go. 

The TADA!: the kids are entertained, and they help you in cleaning-up. If you'll notice, the stuff on the list are items of clothing they used during the day, and toys/supplies they played with. After the hunt, you can lead them up to mealtime {ex. sippy cup} or bath time {ex. rubber ducky} or bed time {ex. toothbrush}. Don't forget to hand them their prize!

10 July 2012

Lime + Lemon + Basil

Hey everyone!

This week's posts are based on the fun ideas found in the recently-released Camp Design Sponge newspaper. Because the temperatures have been rising, I decided to try something refreshing.

Inside, there's a recipe for Basil Limeade.

Here's what you'll need:
1/2 cup freshly squeezed lime juice
1/4 cup freshly squeezed lemon juice
1 cup basil simple syrup {recipe follows}
2 1/2 cups water
1/2 cup basil leaves
ice

Combine lime juice, lemon juice, and basil syrup. Stir well and combine with water. Add ice and garnish with fresh basil leaves.

Basil Simple Syrup
1 cup sugar
1 cup water
1 cup picked basil leaves, slightly packed

Bring sugar and water to a boil in a small saucepan. Add basil and stir to dissolve sugar. Remove from the heat and let steep for 15 minutes. Pour syrup through a sieve, discarding basil. Set aside and let cool before using.

Here's my version served in a re-purposed jam jar. 

The recipe serves four, just enough to share!
Please have a TADA! day.

09 July 2012

The Design Sponge Newspaper

Did you have a wonderful weekend? I hope you did in spite of the scorching heat. I did have a good one with a relaxing barbecue with friends.

When I was working on my "Shopping Tour of New York City", I found this special edition newspaper from Design Sponge. If you're not familiar, Design Sponge is an awesome blog featuring beautiful home tours, unique handmade products, easy cooking and craft ideas, fun city guides, as well as home-based business advice.

Last year, founder Grace Bonney launched the book "Design Sponge at Home". The first Design Sponge newspaper was launched alongside the book. I made a mad dash all around Manhattan and Brooklyn for a copy, but I went home empty-handed. The free newspaper was so popular, they were wiped out immediately.

So you can imagine the little happy dance I made when I saw this newspaper! It's no longer free, but the $5.00 I paid was worth it. If you want to get a copy, here's how. I think the editors plan to make this newspaper a summer tradition. Yippee!

The theme of this newspaper is "Summer Camp" -- a tradition for many young Americans, and a tribute to the 100th year anniversary of the Girl Scouts.

Swimming/Making S'mores/Bunk beds
I was a Girl Scout, but I never went to summer camp. But who hasn't seen "camp life" in the movies -- the buses that shuttle everyone to the property, the fond goodbyes to mom and dad, the bunk beds, thrilling outdoor activities like canoeing and archery, swimming in the lake, and gathering around the campfire to make S'mores.

Inside the newspaper, there are lots of "things to make". Isn't that one of camp's lessons -- to create things with your bare hands? The tent in the photo reminds me of the tent my brother and I made when we were little. We tied three ends of a thin blanket to our bedroom windows. This served as the "roof", while the droopy end was the "door". Inside, we'd lay a sleeping bag and lots of pillows {blah to TADA!, right?}. When the lights were turned off, we pretended we were sleeping outdoors. That was our imaginary camp experience.

The newspaper also has some puzzles and mind games...

...as well as campfire cooking suggestions.

This week, we'll do some blah to TADA! crafting based on ideas from the newspaper, as well as things related to "summer camp".

Before I say goodbye today, I'll share a collage I made of things I would take with me had I gone to camp:

Percolator/Friendship Bracelets/Floral Stool/Sketching Kit/
Picture Frame/Postcards
  • Enamelware like a percolator, cups and plates
  • Materials to make friendship bracelets {exchange them with new friends!}
  • A handy stool in a happy print
  • Colored pencils and a sketchpad to draw and record memories
  • A picture frame with my family photo
  • Postcards and stationery to keep in touch with family and friends back home

06 July 2012

More SOHO Shops

Happy Friday! Today we conclude our shopping tour of New York City. While there are a gazillion places to check out, my main criteria for choosing these shops are the inspiration they provide for artists and crafters. A store isn't just about the items on sale. It's also about the experience and the feeling it wraps you with while you're inside, even until you leave. Does it make you feel luxurious? Pampered? Rich? Or extremely poor {because of the exorbitant price tags!}? After visiting the ones on my list, I hope you'll agree that they spark some creativity within -- like you're itching to make a version of something you saw.

Today, we're still in SOHO. 

All Saints Spitalfields is a British clothing brand that I first discovered in Miami. What drew me into their stores is the window display:  rows upon rows of vintage sewing machines. The clothes are hip, cool, and in muted shades of black, white, grey and beige. The accessories are edgy and utilitarian.  You'll be impressed with the craftsmanship.

Pearl River Mart is a three-level department store showcasing furniture, clothing, fabric, kitchenware, Asian cooking ingredients, paper goods, herbal medicine, and New York souvenirs. I come here for the ceramic dishes, paper lanterns and garlands, and inexpensive party favors. There are also restrooms in the basement, in case you need to make a stop.

Muji is a Japanese brand and branches of this store have opened in many parts of the city. Inside, you'll find clothes and accessories, bags and luggage, toiletries, stationery, furniture, storage and kitchenware. I really like the practicality of the items, their high-quality with a "no-brand name exposed" philosophy. 

Irish fashion designer Orla Kiely just opened a store in SOHO. While her bags and clothes are a little over my budget, her home and office accessories are pretty affordable.

This section in her store is a little piece of sunshine, don't you think? 

Loopy Mango rocks a flea market vibe with ephemera like animal heads, textiles, and jewelry. They carry non-vintage pieces too, like correspondence cards, fragrant soaps and knitting supplies like yarn, needles and books. They offer knitting classes as well.

Here are just a few curiosities at the back of the Loopy Mango shop. 

A visit to Jonathan Adler's shop is guaranteed to make you smile. His home goods are bright and bold, and the ceramics he makes have a witty sense of humor. 

Walls filled with charming fabric and the softest yarn is what you'll expect at Purl Soho. Add needlepoint, embroidery, crochet, and machine sewing to that {for both supplies and classes} -- it's a crafter's dream store!

Dwell Studio has made a name for itself with beddings, home decor, and nursery basics. Founder Christiane Lemieux is also the author of Undecorate. Now, they've got an address to call their own here in SOHO. Browse through the store and fantasize about that dream home you want to dress up.

British designer and author Rachel Ashwell used to have a TV show called "Shabby Chic" which I really liked. She went to flea markets and outfitted a home with her finds -- white linens, floral fabrics, mismatched silverware, crystal candlesticks and chandeliers. Whenever I step into her store, I'm transported to the English countryside where the vibe is relaxed, and I want to stay there forever.

If you're craving something sweet, make a beeline at Georgetown Cupcake. It's a branch of the cupcakery born in Washington, DC and made popular with the TLC reality show "DC Cupcakes".

I hope this week's shopping guide will be helpful the next time you visit New York City. I wish you all a marvelous weekend!


Addresses:
All Saints Spitalfields: 512 Broadway between Spring and Broome Streets
Pearl River Mart: 477 Broadway between Broome and Grand Streets
Muji: 455 Broadway between Grand and Howard Streets
Orla Kiely: 5 Mercer Street and Howard Street
Loopy Mango: 78 Grand Street between Green and Wooster Streets
Jonathan Adler: 47 Greene Street between Grand and Broome Streets
Purl Soho: 459 Broome Street between Greene and Mercer Streets
Dwell Studio: 77 Wooster Street between Broome and Spring Streets
Rachel Ashwell Shabby Chic: 117 Mercer Street between Spring and Prince Streets
Georgetown Cupcake: 111 Mercer Street between Spring and Prince Streets