10 February 2020

A Pretty Pink Heart

On occasion, we like to order some Chinese take-out -- fried rice, egg rolls, or stir-fried noodles. Ummmm, I'm getting hungry just thinking about it.

Most of the dishes come packaged in this box. I think it's well designed because it's eco-friendly, can easily be stacked, and transforms into a plate when opened up.

I discard the box but save the wire. Maybe I can turn it from blah to TADA! 

I play around with it and it easily forms into a heart.

I look through my ribbon stash and choose this pink pompom trim.

I attach it to the wire with hot glue.

The wire is now disguised in adorable pompoms.  I used it as an embellishment for gift wrapping:


And that is how I turned a takeout box handle from blah to TADA! Just in time for Valentine gift-giving.


03 February 2020

A Crochet Heart

Hi guys! I like all kinds of crafts but I tend to shy away from crochet and knitting. I think it's because these have a specific language and set of rules, whereas my crafting style is more "fly by the seat of my pants" or "just winging it".

But I wanted to improve my skills.

So I took out my crochet hooks from the dark corners of storage. 

And found some of my yarn -- mostly garage sale finds and from the craft store sale bin. 

I really wanted to make a crochet heart.  

And I successfully made one...TADA! Thank goodness for You Tube tutorials and instructions on Pinterest.

There are many ways to make a crochet heart so it's always good to experiment and find the most suitable style for you.

I practiced using different colors and eventually made these from memory. Learning a new skill is always TADA!

Here's how I used the crochet heart I made:

I think that this little heart is a thoughtful token to give away.  

I added a bar pin at the back (secured in place using a glue gun).

I made a greeting card using card stock, alphabet stamps, and ink pad.

I punched some holes... 

So that I could attach the heart pin.

I stamped and signed the back of the card (an extra handmade touch).

Inside, I'm writing uplifting words for someone going through a tough time. Maybe she can wear the heart, snap it on her bag or display it on her work space to remind her that she is in my thoughts.  


Here is another version without a pin. The recipient can use the crochet heart however he or she likes. 

It's attached to the card with baker's twine and has a similar sentiment expressing, "I'm here for you."

I hope this gesture will turn their day from blah to TADA!

27 January 2020

A Crafty Tool: Hot Iron Transfer Pencil

I discovered a crafty tool and I'd like to tell you about it.

It's called Aunt Martha's Hot Iron Transfer Pencil and it comes in handy when you need to transfer designs and drawings to fabric. 

Here's how I used it:

I traced a design from a book with tracing paper and the Hot Iron Transfer Pencil. I used a heavy hand so that it copies easily to the fabric.

This project is a good way to turn fabric scraps from blah to TADA!

I flipped the paper with the design so that the pencil side faces the fabric.

I applied heat from a hot and dry iron, hovering for 5 to 10 seconds.

And here is the design on the fabric...TADA!

I mounted the fabric onto an embroidery hoop and applied embroidery. 

Let me present to you my "ladybug on a leaf"...TADA! 

A quick craft that starts with an easy way of transferring the design to cloth and just adding a few stitches. The pencil marks aren't visible here but can be washed off with cold water and dish soap, then air dried, if needed.

How to transfer images to fabric

20 January 2020

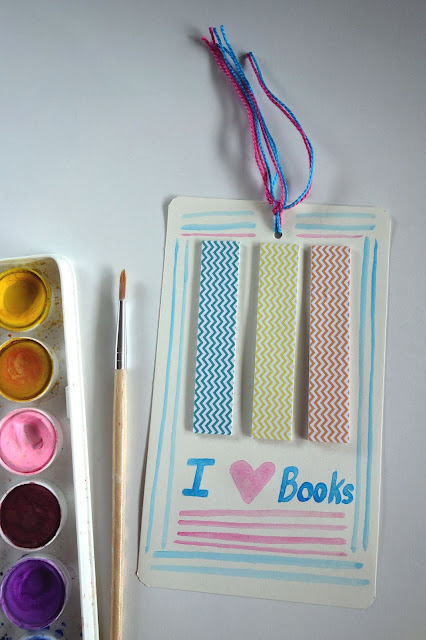
A Bookmark with Page Flags

Reading is one of my favorite pastimes and whenever there's a book, there has to be a bookmark to match.

Over the years, I've turned paper and cardboard from blah to TADA! to make my own bookmarks. Here, take a look:

This one is made from a bakery package that I laminated.

This one was cut out from a paper bag.

These were made from clothing tags.

I thought I'd make a different kind of bookmark this time.

books, reading
The one that contains page flags or mini sticky notes attached to it.

crafting tools, scissors, corner punch, one-hole punch, embroidery floss, watercolor
I started with some simple materials: card stock, embroidery floss left over from a sewing project, page flags (from the dollar bin at the craft store), scissors, and craft punches.   

crafting tools, scissors, corner punch, one-hole punch, embroidery floss, watercolor
Cut the card stock to your preferred size, curve the corners and make a hole with craft punches.

crafting tools, scissors, corner punch, one-hole punch, embroidery floss, watercolor
String and tie the embroidery floss. You can use ribbon, twine or yarn if that's what you have.

crafting tools, scissors, corner punch, one-hole punch, embroidery floss, watercolor
Add some color using paint or pens.

crafting tools, scissors, corner punch, one-hole punch, embroidery floss, watercolor
Attach the page flags to the bookmark.

crafting tools, scissors, corner punch, one-hole punch, embroidery floss, watercolor
And here's a festive bookmark that can be used for books, notebooks, or planners...TADA!

books, reading
If there's a passage in the book that I really love, I can mark it with the page flags. No pesky folded corners, underlines or highlights with a pen -- we get to keep the integrity of the book...TADA!

crafting tools, scissors, corner punch, one-hole punch, embroidery floss, watercolor, books, reading
This craft is easy to make, practical to use, and a thoughtful gift for fellow book lovers. TADA!


Make Your Own Bookmarks, DIY bookmarks

13 January 2020

Pages from my Sketchbook: Everyday People

Everyday, I try my hardest to develop my creativity.  Whether it's something related to making art, solving a problem at work, or mundane tasks at home, I go the route, "What is a fun and unique way to do this?" This approach keeps fear and boredom at bay and who knows, I might just learn something new from it. 

I was reading a book on improving one's writing skills and one advice the author gave (I'm sorry I can't recall who it was) was to "Take home a face." She meant being observant in your daily life. Choose a person and take him or her to your writing desk. Describe him or her in detail -- this will help give animation to your writing.

I took her suggestion and used it for both sketching and writing. Here, let me show you a some of the faces I took home: 

"The Man at the Supermarket"

"The Man at the Coffee Shop"

"The Snow Sisters"

"Modern Day Dracula"

"Strawberry Girl"

I hope I can do this exercise often to allow me to "be present" and appreciate the world around me.