26 April 2012

City Charms

One of the first things I do when I vacation in a new city is to get a map. I like to explore, and while getting lost is part of the fun, losing your way all the time is not fun anymore. 

After my stay, the maps find their way in my suitcase and make the trip with me back home. They're all in a plastic bin in case I need to refer back to them. And how often does that happen? Almost never! So I've turned them into crafting materials. 

Being a sentimental fool is my excuse for hoarding things like maps, labels and receipts. I've decided to get rid of the maps, but not entirely.

Let me explain with this picture:
found on Etsy

Here's another one:
found on Etsy
Aren't they cute? I'll get to keep a small part of the map, wear it everyday, and it'll always remind me of my holiday. 

Here is my blah to TADA! version of the map necklace:

blah: metal pendants purchased at a 
jewelry supply store

TADA!: My very own map necklace!
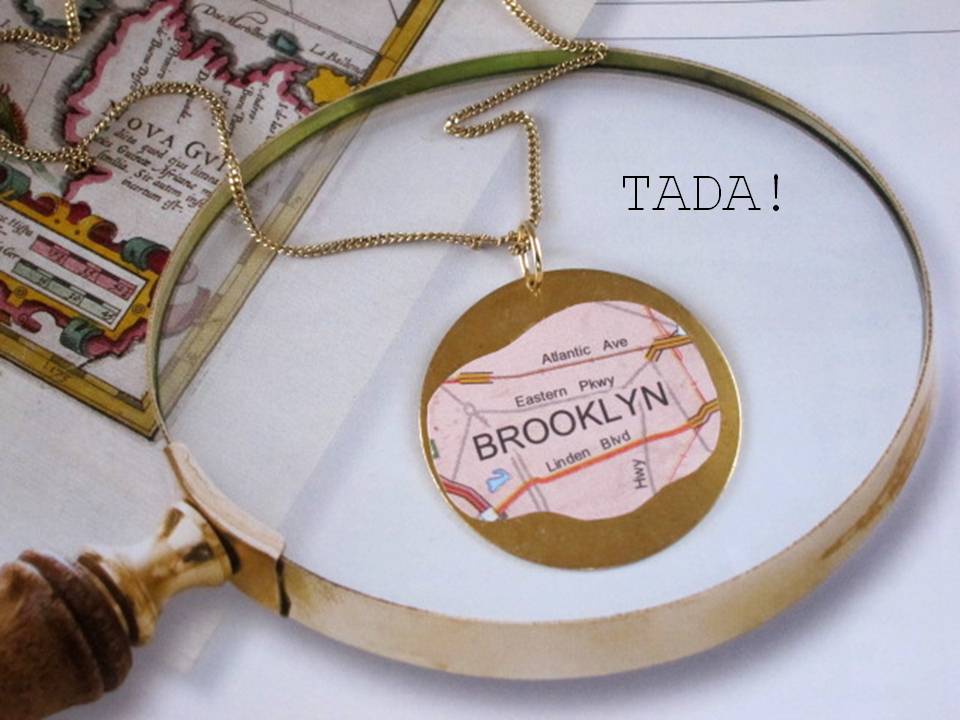
Choose a favorite borough, town, city or country 
from a map. Glue it on the pendant, finish with a 
coat of Mod PodgeAdd a jump ring and string 
this on a chain. TADA!

Here's another one with a collection of cities I've been lucky to have visited and that have left a lasting impression on me: Rome, Paris, London and Amsterdam.

It's also a thoughtful gift for a friend -- find a city where she grew up, or where you met, or even a place she dreams of going to one day. Now I think that's TADA! 

25 April 2012

Travel Diary

Thanks for stopping by today!

If you've been tuning in, the blah we're turning into a TADA! this week, are old maps. Today, I'm using them to prettify a few notebooks.


These pocket notebooks were 50 cents for a pack of two. What a steal, right? But I think the covers look quite blah. And you know what comes after that...

TADA! Notebooks that are ready to travel the world! 

Simply cut the map to fit the cover and 
adhere with a glue stick.

They're just the right size to fit a camera bag or jacket pocket. It's a handy tool to make lists, jot down expenses, or scribble mundane observations. 

They make a nice gift too.

Make it for yourself, share it with a friend and may you have many memorable vacations!

24 April 2012

Map Notes

Thanks to vehicle navigation systems and smart phones, we feel more confident getting to a location without the need for a map. Are maps turning obsolete? 

No matter, they're definitely a good item to 
turn from blah to TADA!

Today, we'll turn an old map into stationery.
Here's how:

You might have maps that are large enough to cover your entire upper body. Cut this up into a manageable size. 

Cut some more and attach this to one side of folded card stock or construction paper with a glue stick. TADA!, your map has assumed the identity of a note card!

Time to make the envelopes: use an old envelope as a pattern {open it up} and trace this on the map. Cut around it, fold the edges, and add some glue where necessary.

TADA! Easy envelopes!

Pair off the cards with the envelopes and use 
them immediately.

Or slip them inside a berry box, add some pens and 
garnish with a ribbon. Now, who would say no 
to a gift like this?

23 April 2012

Marvelous Maps

I hope your weekend was fabulous!
This week, it's all about maps on my blog.

I admit to still using maps, especially when visiting a new city. They're very useful to find your way or discover a new landmark. But when you're done with them, what do you do? Turn them from blah to TADA! of course!

Here are a few talented folks who did just that and are selling them on Etsy:

A matchbook wrapped in an old map and the matchsticks 
are trimmed to mimic a city skyline!

Old maps crafted into romantic roses.

Vintage map inspired throw pillows

If you love a city, I don't see why you can't wear it

Or you can wear them as cuff links, too!

A map can also be laminated and 
sewn into a bag.

Aren't these ideas terrific? Stop by this week and let's see what else we can do with maps. Have a nice day!

20 April 2012

Let 'em Dangle

Yippee yay, it's Friday!

Today's jewelry rack idea is made of these blah materials: cardboard and paint stirrers {free from the hardware store}.

We'll need these too: ruler, pencil, paint brush, scissors, hole punch, paint and hot glue

Cut the cardboard into thin strips {about 1 inch for the width and 10 inches for the length}. We'll need three to five pieces of these.

Glue at least two paint stirrers together to 
form a sturdy foundation.

Here's what the jewelry rack looks like after painting the pieces individually and gluing them together on a wooden base. The paint stirrer is at the center and the cardboard strips intersect it.

Make pairs of holes across the cardboard strip with a hole punch {do this after painting the strip}. Avoid making holes at the mid-point of the cardboard strip because this area will be glued to the base. 

 Use the holes to attach stud earrings or 
hang ones that dangle.

TADA! A display rack for earrings for your dressing table at home, or for your booth at the craft fair or tag sale. Have a sparkly weekend my lovelies!

19 April 2012

High Five

Several kind people have been "pinning" some of my blah to TADA! ideas on Pinterest. Holy smokes, my projects are worthy of a pin?! Thanks guys! And for you who found me through Pinterest, welcome to my blog!

One of my most popular "pins" is the necklace and bracelet rack I made using paper towel rolls. This is the reason I have a new batch of jewelry organizing ideas this week, whether you'll use it at home or if you're participating in a craft fair. 

Today, I'm making a TADA! ring display using these blah materials: cardboard, wood base, a pencil, scissors and hot glue. 

I trace my hand on the piece of cardboard.

Then cut around it.

Oh, we'll need paint and a brush, too.

Paint the hand and wood base {I bought this at the craft store for less than $1.00}. Make several coats.

Attach the bottom of the hand to the wooden base with hot glue. Allow to dry. Then add your rings! TADA!

Remember this when cutting out the hand: make some parts of the fingers skinny to fit different-size rings.

You can make a bigger version with a larger piece of wood and more hands.


Sending high fives your way!