08 April 2019

Greeting Cards for Travel

What are the odd things you like to take with you when you travel? 

I like to bring stationery with me.  And I pack it in this little kit...TADA! 

The sleeve was once home to notecards. I saved it because it's clear (to easily spot its contents), compact (carries what I need), and the plastic material protects all the paper inside. 

Here are some of the cards that I included in my kit:

Thank you cards to express appreciation to hosts and other gracious people I meet while traveling.

Personalized cards for an extra special touch.

Blank cards that can easily turn into "Happy Birthday", "Congratulations" or "I'm thinking of you" greeting cards.

I included a favorite writing pen and some envelope seals.

A glue pen (to close the envelopes) and some postage stamps are handy, too.

Pack everything up and add it to your suitcase.

Pack A Letter Writing Kit whenever you travel
With a kit like this, it's easy to keep in touch the old school way wherever you are in the world...TADA!

01 April 2019

Handmade Birthday Cards

One of the things I find truly satisfying is sending out birthday cards. It tells my friends that they are thought about fondly on their special day. And over the years, my friends have told me that this small gesture is appreciated. And that is just TADA!   

Instead of buying ready-made, I like crafting these cards. Each year, I pretend I'm a designer and make a "collection." Below are some of the ones I sent out last year. The theme was "golden spring." They are made of gold-foil cards dressed up with flowers, watercolor paintings, and pastel-colored ephemera. I love springtime as a jumping off point because isn't that what birthdays are about -- fresh beginnings?


It's not a designer label but it tells a story of a handmade touch. TADA!

And incidentally, April is "National Letter Writing Month". Let's write more cards and letters and keep snail mail alive!

25 March 2019

A Bento Box

Do you bring your own lunch to work? I'm usually equipped a snack whenever I go and I thought I'd turn a plain old meal from blah to TADA!

I got these shape makers from a culinary store. I've seen them in Japanese groceries and Asian stores, too.

To use it, put a peeled hard-boiled egg inside the crevice.

Close the case and let it sit for about 12 minutes.

Open it and the egg takes the shape of the mold...TADA!

It adds whimsy to a lunch box whether you're a child or an adult, don't you think?

18 March 2019

A Bead Necklace

Hi guys! What a pleasure to see you today. 

I saw this necklace at a store and was inspired to make something similar.

You see, I have a lot of beads. They sit inside a box hollering, "Turn me into a piece of jewelry!"  Any reason to craft is fine by me so I heeded the call. 

I attached each bead to a chain using head pins and pliers.

I kept adding beads to fill half of the chain. 

And this is what my D.I.Y. necklace looks like...TADA!

It can turn the plainest outfit from blah to TADA!

11 March 2019

Handmade Stickers

I have a pack of plain white adhesive paper. I got it at the craft/office supply store. I didn't have a particular project in mind when I bought it, maybe use it for labels? I got around to making some stickers. Let me show you how:

Step 1: Add color to the blank sticker page. I used watercolor paint 
to make a marbled effect. Allow the paint to dry.
Step 2: Use a craft punch to cut out shapes.
Step 3: Use a single shape or experiment with different shapes.
Use a pair of scissors if you don't have a craft punch.
Step 4: Make smaller stickers from the trim to avoid waste.

gift wrapping ideas, creative gift wrapping
I like to use them to embellish envelopes and packages...TADA!

gift wrapping ideas, creative gift wrapping
 Playing around with print on print!

watercolor, paint your own stickers
Here's another DIY sticker idea using small labels decorated with paint...TADA! 
rubber stamps and ink pad, cup and saucer, coffee, gifts for coffee lovers
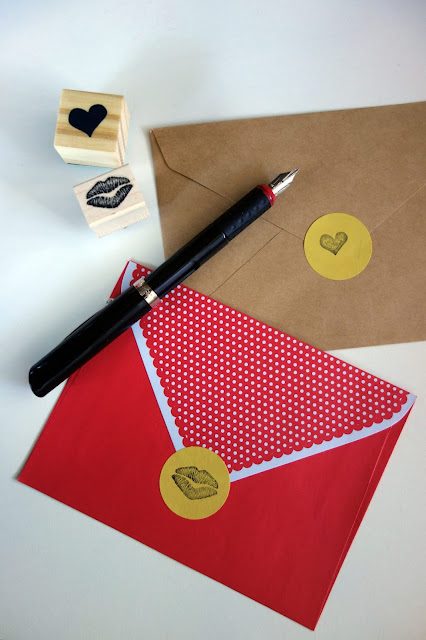
You can also use rubber stamps and ink.

rubber stamps and ink pads, sealed with a kiss, kiss stamp, heart stamp
I really like these...a kiss and a heart!

stationery, sealed with a kiss, rubber stamps and ink pad, snail mail, writing, correspondence
They're perfect to use as envelope seals. A cute way to say, "Sealed with a kiss".

04 March 2019

Coffee-Inspired Crafts

I think you'll agree that many of us can't start a day without a cup of coffee. It's a necessity. 

It's coffee that inspired today's blah to TADA! transformations.

I saved this disposable cup from a coffee run and cleaned it up.

While keeping the eye-catching bull's eye, I used it as a canvas for some abstract art...TADA! 

Here's an idea from the archives. Dress up a cardboard coffee sleeve to "wrap" a reusable coffee tumbler when giving it as a gift...TADA!

Another one from the archives: a coffee sleeve made from an old t-shirt...TADA! If you like to knit or crochet, you can make something similar using yarn in your favorite color. It's perfect to keep reusing!


This is a greeting card that I found at a drug store. I found it so cute -- look at the tiny box of doughnuts and that adorable cup of coffee! I'll use this photo for reference...maybe I can make something similar with a match box, scrap cardboard, paint, and glitter.  

Here's an idea for a coffee-loving friend:


Give him or her a gift card to their favorite coffee shop and wrap it in a "To-Go cup".  

It's a quick craft made from card stock, cardboard, scissors, and glue.

I also used paint, rubber stamps, and an ink pad to decorate the To-Go cup "sleeve".

I folded the card stock in half, trimmed the edges to look like a cup, attached the gift card with tape, and wrote a short message.   

I glued on the sleeve and the lid (both made from cardboard) and it's ready to give away...TADA!

Cheers coffee lovers...have an awesome week!

26 February 2019

In the Kitchen: Canele de Bordeaux

Yesterday, I wrote about this book I've had for several years now:

My Little French Kitchen is written by Rachel Khoo where she travels all over France while sharing recipes along the way.

She's your girl next door, always up for trying something new. She likes to paint and she has a cute collection of vintage dresses.  

The book showcases beautiful shapshots of food and France.

How lucky was she to make Christmas cookies with a French grandmother. 

She even went to a flea market in Bordeaux and shopped for plates.

Of all the recipes, the Canele was the first one I wanted to try. Whenever I see these at a patisserie, it has to come home with me. A Canele is a small cake that's soft and custardy on the inside, crisp with the taste of caramel on the outside.

It's traditionally made with copper molds that need to be lined with beeswax. Copper molds and beeswax are way beyond my budget, and this entire process was too tedious and intimidating for me.

But Rachel encourages the use of silicone molds (I got this for about $10).

The batter has to sit for 48 hours or up to 5 days, resulting in tender cakes (it can be spelled "Canele" or "Cannele"...I checked! Regardless of how you spell it, the pronounciation is "ca-neh-lay").

Ladle the batter in the silicone mold, four-fifths full. Bake these in an oven pre-heated to 475 degrees Fahrenheit for 15 minutes. Then lower the temperature to 375 degrees Fahrenheit and continue to bake for 1 hour. 

After an hour, I flipped the mold and removed the caneles.

And here they are. TADA! 

Light inside with a nice sugar crust formed on outside. Not bad for my first try!

Thank you Rachel for this! You'll find the recipe here.

I also can't wait to dive into her more recent cookbook, The Little Swedish Kitchen