22 August 2012

Pearly Shell

Happy Wednesday! Before we get into detail with today's blah to TADA! transformation, let me show your a few photos for interior inspiration:

via the neo-traditionalist

via the neo-traditonalist

via the glitter guide

via the glitter guide

via the glitter guide
Notice the little bowls in each photo? Whether these are new purchases or flea market finds, they make adorable decorative pieces that function as a catch-all for keys, paper clips or jewelry. 

I feel I need a bowl just like those in the pictures. I also feel the need to craft! And  let's throw in some recycling, too.

I'm phasing out some of the blah nail polish I have, in favor of more safe and eco-friendly ones. I'll reuse these as paint for this glass bowl that's looking a little blah:

 {Look for glass bowls at garage sales or thrift stores.}

When painting with polish, it's better to work outdoors or in a well-ventilated area because the scent can be quite overwhelming. Don't forget to cover your work surface with newspaper.

Work with a clean and dry glass bowl, and liberally pour in the polish.

Swirl the bowl to evenly distribute color. Use two or three coats {allow polish to dry in between coats}. You can combine two shades of similar colors or try contrasting colors, too.

I love the pearlized finish provided by the polish!
Allow this to dry and air out for a few days
{ideally outdoors}.

 Once dry, use it for decoration.

And for storage as well. 

TADA!

21 August 2012

Marbled Jars

Today's blah to TADA! project is inspired by these jars I spotted at Anthropologie several months ago:

These jam jars were part of the store display, as if to mimic the sorbet colors of their spring collection.

They're just ordinary mason jars with a marbled effect created by different hues of paint. 

Well, I'm on a mission to reuse my bottles of nail polish that are waaaay past their prime. Did you know that nail polish are considered hazardous waste? You just can't throw them in the trash or in the drain; doing so is harmful to the environment. You can do this, or use them for crafty pursuits.

We'll make our own marbled jar using polish instead of paint:

blah: old bottles of polish and a clean & dry jam jar 

Work outdoors and cover your space with newspaper.

Randomly pour the polish into the jar. 

Use as many colors as you want {I stopped at three}.
You can allow the first polish to dry before 
adding the next for more defined colors.  

Swirl the jar so that all the walls are covered in color.

 Leave to dry outdoors for a few days 
{this also helps get rid of the strong polish scent}.

TADA! A marbled jar!
Notice that each side has formed a unique pattern
with a high gloss finish.

Use it to hold favorite supplies like pencils or make-up brushes. Please make sure to keep this jar away from flame {nail polish is highly flammable} and food products.

20 August 2012

Painting with Polish

Hi ya' all! I hope your weekend was glorious!

Do you like nail polish? I wear it mostly on my toes during the spring and summer months for sandal and flip flop season. I only wear them on my nails for special occasions; I damage them quickly, I must admit. I'll have a dent in the polish even before I leave the salon, and I have yet to master how to professionally apply them myself.

I have a small number of bottles, tucked away in a cosmetic pouch in the bathroom cabinet. By no means do I have a collection this big: 

via the glitter guide
And this isn't in a nail salon. It's found in someone's home! Pretty neat, huh?  

Because I don't wear polish all that often, the bottles I have look like they're brand new, even if I've had them for years. Some sources say, the shelf life of nail polish is one to two years. Other say they don't expire at all.

Personally, I think I have to get rid of some of mine. Some have separated, and the others have gone beyond their second birthday. I know you can see it coming -- a little blah to TADA! is in order.

Just like the old lipsticks from a few posts back, I'll try using them as a painting medium on stretched canvas.

Abstract art using blues and purple...TADA!

A few sweet dots in pinks, peaches and red...TADA!

Do this project outdoors since the polish can have a strong odor. Allow to dry {also outdoors} for a few days before adding a frame and displaying your handiwork.

17 August 2012

Homemade Gift Wrapper

A Happy Friday to all of you out there!

Today's blah are these plain tissue paper. Oh, you've encountered them before, as a secret layer inside a gift box or to secure things you've bought, tucked inside a shopping bag. 

Sure, it's easy to throw them away without guilt {they're paper!}. You know me all too well to know that I keep them. Because they've lived a smug life inside boxes and bags, it doesn't mean we can't show them off. 

Add a little paint to make it TADA! 

Play around with patterns and color. 

When the paint dries, used it as gift wrapping paper. 

Personalize it with more paper and paint. 

 Remember the bubble art we made a few weeks ago?

We can turn it into gift wrap, too. 

Top it off with a flower also crafted from the same paper.

If you want to avoid spending on gift wrap, 
rescue some paper at the same time, and
add a unique touch to packages, this might
just work for you!

Have a sunny weekend!

16 August 2012

Stripes and Sparkle

Don't you love receiving gifts, especially those that are thoughtfully wrapped? The next time you give a gift, maybe you'd like to add some pizzazz to the package. Don't worry, no expensive wrapping paper needed -- we'll reuse materials that we have on hand.

blah: a paper bag from an afternoon of shoe shopping 

The stripey part is quite attractive, 
but let's get rid of the label. 

Simply cut out the bottom part.

 Create a new bottom by folding the paper and
gluing in place.

If the mouth of the bag looks sad and frayed, just fold 
over into the bag {about half an inch} and 
secure with glue. 

 TADA! It looks nice and neat.

We'll use alphabet cut-outs made from glitter sticker paper
{go ahead and try out other kinds of paper}
or glitter letter stickers if you have them. 

 Experiment with the layout and stick them on 
the bag once you are satisfied.

Just add the gift {and a card} and it's ready to be given away. 

TADA!

15 August 2012

Capturing Butterflies

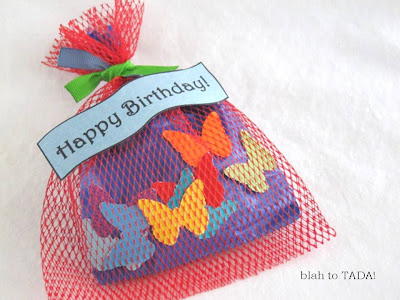
Today, I've got another use for this blah produce sack:

It was once supermarket packaging for a family of shallots.

 Don't worry, they didn't leave an onion-y smell on the sack.

From blah, I present the TADA!:

Another fun way to wrap a present! 

The gift is still kept a mystery with
the use of blue tissue paper.

Butterfly confetti made its way inside for
extra pops of color.  

Secure the top with ribbon remnants and
a fantastic greeting.

When wrapping gifts, what non-traditional
materials have you used? I want to know!