26 August 2019

The Marvelous Mrs. Maisel

Hi guys! I went to a delightful exhibit last week and I'd like to share with you what I saw. Come join me!

Tony Shalhoub, Michael Zegen, Marin Hinkle, Kevin Pollack, Alex Borstein, Amy Sherman-Palladino, Daniel Palladino
Have you seen the TV show, "The Marvelous Mrs. Maisel"? It's a comedy series set in the late 1950's starring Rachel Brosnahan as the feisty Mrs. Maisel. She had it all -- a successful husband, two children, a close relationship with her parents, accessible childcare, a college education, and a large apartment on New York City's Upper West Side. 

She was living a very comfortable domestic life. Until she and her husband Joel decide to separate. She quickly finds a job at a department store during the day and as a stand-up comic at night.  

The show has won (and has been nominated) for multiple awards for acting, writing, directing, cinematography, music, set and costume design.

And these are the reasons why I love the show -- it's lighthearted, funny, and it takes you back to that period in time.

When it was announced that a "The Marvelous Mrs. Maisel" exhibit was going to open at The Paley Center, I made sure to attend! It showcases sets and props from the show:

The set of Mrs. Maisel's first TV show appearance

The set of Mrs. Maisel's first TV show appearance at the Arthritis Telethon

B. Altman Department Store, beauty counter, TV set, The Marvelous Mrs. Maisel TV set, props
B. Altman Department Store where Mrs. Maisel worked during the day

lipstick, perfume, props, flowers, department store counter
The make-up counter at the B. Altman Department Store

lipstick, perfume, props
The make-up counter at the B. Altman Department Store

B. Altman Department Store, switchboard, set design
The B. Altman Switchboard room where Mrs. Maisel also worked as an operator

headset, switchboard,
Guests can wear the headset and hear dialogue from the show

Indeed Mrs. Maisel was a cheerful operator

mail room, mail bin, packages, props, set design, B. Altman Department Store
The department stores back then also accepted items for mailing

Stage Deli, TV set design, Jewish Deli
The Stage Deli where Mrs. Maisel and her manager Susie shared lots of meals

Stage Deli, TV set design, Jewish Deli
Look at the prices from the 1950's

Stage Deli, Jewish Deli, TV set design
Guests can sit at the booth...a nice photo op 

TV set design, 1950's
A summer trip to the Catskills in Season 2 

TV set design, 1950's hair salon
The hair salon at the Catskills

TV set design, 1950's hair salon
The hair salon at the Catskills

Paris apartment, TV set design, Eiffel Tower
Some scenes in Season 2 were shot in Paris.
This is Rose's pied-a-terre (Rose is Mrs. Maisel's mother)

TV set design, wardrobe
Rose had a beautiful wardrobe that Mrs. Maisel borrowed from

shoes, 1950's, set design, wardrobe, costumes
Shoes to match purses and hats

Sketches, swatches and inspiration

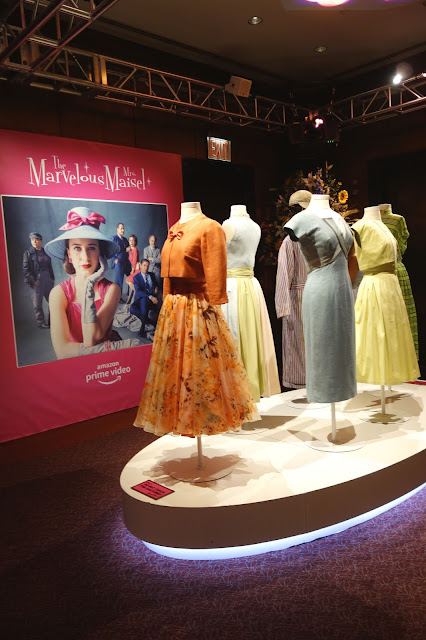
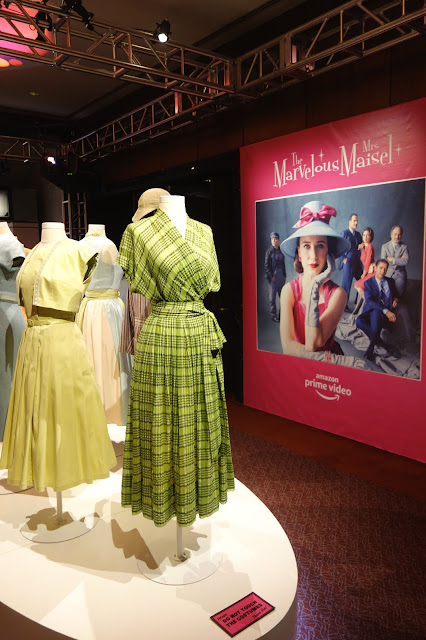
And the best part -- some of Mrs. Maisel's dresses were on display:

wardrobe, costumes, 1950's dresses

wardrobe, costumes, 1950's dresses

wardrobe, costumes, 1950's dresses

wardrobe, costumes, 1950's dresses

wardrobe, costumes, 1950's dresses

wardrobe, costumes, 1950's dresses

wardrobe, costumes, 1950's dresses

sketch of dresses, watercolor painting, costumes, 1950's dresses, wardrobe, costumes, 1950's dresses
I love how women were smartly dressed, I just had to make this sketch...TADA! 

By the way, there's also a theater to watch some episodes from the show.

logo, graphic design, fonts,
I hope you liked our little outing today.

If you're in New York City, the exhibit runs until September 7, 2019 at The Paley Center. Entrance is free but you need to reserve a slot on-line

Have a good week, everyone!

19 August 2019

Crafty in the Kitchen: Homemade Yogurt and Ricotta

Hi there! This little blog of mine is very craft-focused but I also like to do a lot of crafty things in the kitchen from baking, cooking, and making jam.


Like most people, I succumbed to purchasing an Instant Pot after weeks of weighing its pros (faster cooking time! a pressure cooker that's not intimidating!) and cons (no counter space! I don't need another appliance!). And because I want to make the most out of this purchase, I'm trying out its many functions.

Guys, I made my own yogurt! I got the recipe from this book. It's easy but it needs a lot of time. I allow it to cook overnight and when I wake up in the morning, I have yogurt...TADA! 

Here's the recipe:


Homemade Whole Milk Yogurt 
from the book "How To Instant Pot" by Daniel Shumski

Total time: 12 hours and 30 minutes (including cooling time)

Active time: 10 minutes

Yield: Makes about 8 cups


Ingredients:
2 quarts whole milk
2 tablespoons whole milk, 2%, or skim yogurt with active (live) cultures

Procedure:
1. Place the milk in the inner pot. Close and lock the lid. Set the valve to Sealing.
Press the Yogurt button and then press the Yogurt or Adjust button until the 
display reads "Boil."

2. Allow about 30 minutes for the program to finish. When it has finished, press 
Cancel until the display reads "Off." Use oven mitts to remove the inner pot (be 
careful -- it's hot!) and place it on a trivet or other heat-resistant surface. Allow 
the milk to cool, stirring occasionally, until the temperature drops to 110 degrees
Fahrenheit as measured on an instant read thermometer, about 1 hour. (If you do 
not have a thermometer, use a small spoon to drip a few drops of the milk on the
inside of your wrist. It should feel just above body temperature -- very slightly 
warm but not hot. Err on the side of too cool, since too much heat will kill the 
necessary bacteria in the yogurt in the next step.)

3. Add the yogurt to the inner pot and stir thoroughly.

4. Return the inner pot to the Instant Pot. Press the Yogurt button and use the 
Yogurt or Adjust button to select the middle temperature ("Normal"). Use 
the - or + button to set the time to 8 hours. Close and lock the lid. Set the valve 
to Sealing.

5. When the cycle ends press Cancel and remove the lid. Stir the yogurt and then
use a large spoon to scoop it into a container with a lid or single-serving containers
with lids. Place the covered container(s) in the refrigerator to cool, about 3 hours,
before serving.

Whole Milk Yogurt will keep, in an airtight container in the refrigerator, for up 
to 2 weeks.

I found the yogurt a bit runny. To remove the excess liquid, I put it on cheesecloth on a strainer sitting on top of a bowl. Here are some ways I like to eat my homemade yogurt:

Fruit and Granola Yogurt bowl - I sweeten the yogurt with some honey and I top it with seasonal fruits and a handful of granola.

Smoothie Bowl - In a blender, I make a smoothie made of yogurt, fruit (ex. bananas, berries or apples) and greens (ex. spinach). I can also add flax meal, cinnamon or honey. Then I pour the smoothie into a bowl and top with fruit (fresh or dried), nuts and granola.

Mango, Coconut and Chia Seed Parfait - I put a tablespoon of chia seeds in a cup of yogurt and let it sit in the fridge overnight to make the chia "bloom." I topped it with cubed mangoes and flaked coconut...TADA!

*****

Guess what? I also made my own cheese in the Instant Pot!

Here is the recipe for Ricotta:

Do-It-Yourself Ricotta
from the book
 "How To Instant Pot" by Daniel Shumski

Total Time: 2 hours 45 minutes (including cooling time)
Active Time: 15 minutes
Yield: Makes about 2 cups


Ingredients:
1 quart whole milk
1 teaspoon salt
4 tablespoons freshly squeezed lemon juice

Procedure:

1. Place the milk in the inner pot. Close and lock the lid. Set 

the valve to Venting. Press Yogurt and press the Yogurt or Adjust

button until the display reads "Boil."

2. Allow about 20 minutes for the program to finish. When it has 
finished, press Cancel. Use oven mitts to remove the inner pot (be 
careful -- it's hot!) and place it on a trivet or other heat-resistant 
surface.

3. Stir in the salt. Slowly stir in the lemon juice, 1 tablespoon at a
time. The milk will coagulate, gathering together in small lumps as
the lemon juice is added. Wait about 5 minutes for the milk to 
coagulate further.

4. Place a fine-mesh strainer over a medium bowl and pour the milk 
through it. Let it drain until only the solids remain in the strainer,
about 10 minutes.

5. Use a spatula to scrape the solids into a container with a lid. Cover
the container with a lid. Cover the container and refrigerate it until
chilled, about 2 hours.

Do-It-Yourself Ricotta will keep, in an airtight container in the 
refrigerator, for up to one week.

Tip: The liquid leftover from straining is whey and is rich in protein.
Substitute it for water in pizza or bread dough, or incorporate it into
smoothies.

If the ricotta is too dry when you're ready to use it, add a little milk to re-hydrate it. Here's how my husband and I used the ricotta: 

Ricotta Toast - spread a generous amount of ricotta on whole grain bread and top with fresh fruit like nectarines and blueberries (figs or strawberries are good alternatives, too). Top it with walnuts, drizzle with honey, and sprinkle on some flaky sea salt.

Tomato and Ricotta Salad - thinly slice heirloom (or any) tomato, top with arugula and basil (or other salad greens), add puddles of ricotta, dress with balsamic vinegar, and season with salt and pepper. If you like, serve with a protein like slices of grilled steak or chicken.  

Ricotta Panna Cotta with Nectarines and Honey - this is a tangy version of panna cotta, a recipe from Bon Appetit.


I hope these recipes inspired you to get crafty in the kitchen, to try something new, and to eat a little bit healthy, a little bit indulgent...TADA!

12 August 2019

Ribbon Embroidery

Hello! My cousin and her family came to visit and she gave me a most adorable gift:

It's a set of boxed cards decorated with ribbon embroidery.

They are made by a group in the Philippines called Martha and Mary's Garden of Hope where women are taught livelihood skills to better their future. Gradually, these women's lives are turned from blah to TADA!

The set included 5 cards and matching envelopes. 

Here are the cards up close:


Aren't they sweet? The women captured every little detail like the flick of the petal, the colorful stigma, and the delicate buds.

The cards are blank inside -- lots of room to jot down thoughts and wishes!

It's something that's a joy to give and receive!

And speaking of ribbon embroidery, here is a short tutorial from a post many, many years ago

I am all for learning new skills, crafts for a cause, and empowering women. TADA!

05 August 2019

Print on Print

Hello everyone! Maybe you have a few books that you want to get rid of? We can, of course, donate them to a thrift store, used book store, or set-up a Little Free Library in the neighborhood. 

We can use them for crafting! Let me show you some inspiration:

I found this poster and many others like it at a bookshop in Portland, Maine. They are made by a company called Vintage Dictionary Art using authentic Webster Dictionary pages. I think they make thoughtful gifts to book lovers and writers...TADA!

These adorable animal portraits are painted on old book pages. They are mounted on wood and are ready to hang. I spotted them at The Country Living Fair a few years ago.

I also found these at The Country Living Fair. The old book pages are used only as part of the packaging for the actual product (book marks/gift tags). But I like how the shop owner used this little detail to enhance her products and display.

Here are a few crafts that I made using old books:

I tore a page from an old book and folded it into a paper bag. I added a bird stamp and tied on some twine to turn it from blah to TADA!


This one is from the blog archives. It's a gift wrapping idea using an old printed page as a "belt". I think it adds another layer of visual interest.


Another one from the blog archives: I painted my friend's initial on a page from an old book. I framed it and it became a simple, handmade gift...TADA!

Here's another one from the blog archives where I dressed up a handmade bookmark with washi tape, stamps, and old book pages. 

With these in mind, you're ready to turn your old books from blah to TADA! Please share with me what you make, okay?

29 July 2019

Five Handwritten Cards for Healing

A handwritten note holds great power.  It tells the recipient that they are loved, are thought about kindly, and that they matter.

Do you remember the last time you received a handwritten card, perhaps for a birthday or someone expressing gratitude to you? What did you feel? Wasn't it warm and fuzzy, like you were the most special person on earth?

Why not pay it forward? It's a good excuse to buy nice stationery and a good pen, and more importantly, to brighten somebody's day.

Here are five cards I've sent over the years to those who I think really needed it the most. I call them "Cards for Healing".


1. A card of support after a tragedy


On Valentine's Day in 2018, a tragic mass shooting happened at The Marjory Stoneman Douglas High School in Florida. 

School should be a place where one feels safe but not in this case. The event made students, parents, and teachers associate school with fear and tragedy. The school was closed for some time.  

When the school was scheduled to re-open, I found out on Instagram that one of the teachers encouraged letters and posters to be written for the students. These would be put up on the walls to uplift the students. How could I not participate?

I hope that in my own little way, I have given them some encouragement. I also hope that all these mass shootings will finally stop. 


2. A card for someone going through illness

When I find out that a relative or friend is going through illness, I try my best to reach out. Nobody wants to hear difficult news and if and when they do, they need a hand to hold. 

I made this card for a friend of mine. I told her that for each flower I painted, I said a prayer for her. And that my prayers continue even after I gave her the card. 

I hope that this card is a reminder that her family and friends will her to get well and that she should never give up.  


3. A card for someone who suffered a loss

This is a card I made for a dear friend who lost her partner.  I told her that I share her sadness and included some memorable stories we all had together. 

I received similar letters when my parents passed away. And they gave me so much comfort. Whether it's a loss of a parent, spouse, or a miscarriage, letters like these are always appreciated.  


4. A card commending someone for their bravery

Dr. Christine Blasey Ford bravely testified against then Supreme Court nominee (now Supreme Court Justice) Brett Kavanaugh. In a televised hearing, she recounted a traumatic event that happened between them when they were teenagers. Even if she was afraid and received death threats, she still did it because she said it was her civic duty.     

My heart went out to her and I wanted to let her know. I found a mailing address on Twitter and wrote her a letter telling her that I believed her and I was thankful for her bravery.  


5. A card offering support

Everyone goes through rough patches -- loss of a job, an opportunity not pulling through, a break-up. These moments can be devastating. Words of encouragement may just be what they need to pick themselves up again. 


It is my hope that cards like these turn blahs into TADAs!